
Contents | Start | End | Previous: Chapter 5. Importing Files | Next: Chapter 7: Editing Your Book’s Metadata
Jutoh is not just a way of converting existing files to ebooks: one of its major strengths is the ability to edit and tweak your book before creating the ebook in the desired format(s). In this chapter we’ll learn how to edit and format your book’s text and graphics.
First, a quick word about why Jutoh projects, and ebooks in general, are divided into sections. A section can be a chapter, a title page, a table of contents, and so on. Most ebooks are comprised of sections rather than being one enormous chunk like a Word document. One reason for this is because some ebook readers, with their restricted memory, simply can’t cope with large chunks of text; or if they can, slow down when loading and paging through such a book. Another reason is that it is easy to compile a table of contents for a book that’s divided into sections (though Jutoh can also look inside sections for headings if required). Via section properties, you can tell the ebook reader that a section is a table of contents or other kind of section, which you couldn’t do if it was buried inside one huge section. Finally, you’ll find it easier and faster to navigate and edit a book divided into sections.
If Jutoh didn’t split up your book when importing, you can do it manually, one split at a time. Place the cursor on the paragraph you wish to be at the start of a new document, and use the command Edit | Split Document. If you change your mind, you can’t undo this with Edit | Undo, but you can join this document with the next one using Edit | Join Document. If the new document was inserted at the wrong place, you can drag it into the correct position.
You can edit the title of a particular section by clicking on the title above the editor, as shown in the illustration below, or using the Rename command on the project outline’s context menu (right-click to see it). This title will be used in the automatic table of contents.
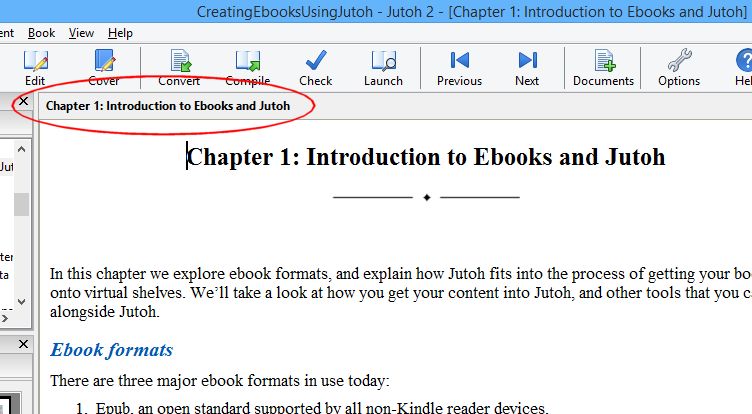
The clickable section title
When you click on a book section in the project outline, or create a new book section with Document | Add Book Section, you are presented with the Jutoh editor. You can use this just to review the content in your book, or you can edit the text, graphics and formatting. Many of the editing keystrokes will be familiar from other editors, though there will be some differences. Here are the more important keyboard and mouse operations:
Use the arrows to navigate a character or line at a time. Hold down the control key to move a word at a time.
Use Page Up and Page Down to move up and down a page at a time. Home and End move to the beginning and end of the line respectively; hold down the control key (command key on Mac) to move to the start or end of the whole section.
Use Shift+Enter to insert a line break character within a paragraph. Use this sparingly, if at all, since it can be confusing to edit paragraphs containing line breaks.
Hold down shift with a navigation key to select content; you can use Ctrl+A to select all text in a section.
Use double-click to select a word, and drag the mouse to select a region of text. Several separate areas of selection are not supported.
In addition to the toolbar buttons and menu commands, you can use Ctrl+C to copy text, and Ctrl+V to paste text. To move text, you can use Ctrl+X to cut and Ctrl+V to paste.
Use Edit | Paste Unformatted Text to strip formatting out of the text you are pasting, useful if the original formatting is not applicable to the current context.
Use Ctrl+Z to undo an operation, and Ctrl+Y to redo it.
Use the drop-down style control on the editor toolbar to apply paragraph styles – more on that later.
Click on objects such as images to edit their properties, or use the properties command such as Image, Box, or Table on the context (right-click) menu.
Some editing commands are also available on the context menu, which appears when you right-click over the editor (control-click on a Mac).
You can change the size of the text for editing purposes (not the actual book text size) by clicking on the Font Properties  tool on the toolbar and then selecting Larger or Smaller, or you can go to the Appearance panel in the Preferences dialog and change the text size in Font for text documents. In this panel, you can also change the default text foreground and background colours and the maximum size of the editor window.
You can use the tools in the Formatting Palette for applying styling and inserting objects:
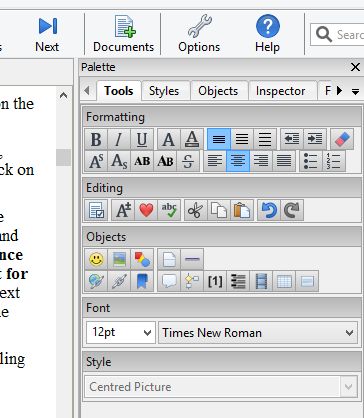
The Tools page in the Formatting Palette
The tool buttons are equivalent to commands on the Format menu.
If possible, text formatting such as font family, size, colour, bold and so on should be defined using named styles (see later in the chapter) and not on an ad hoc basis, sometimes called ‘direct formatting’. However, sometimes it’s convenient to change the formatting directly, for simple styling. You can select a span of text and use toolbar buttons or the Format | Character command which gives you size, colour, weight, style and other options, as shown below:
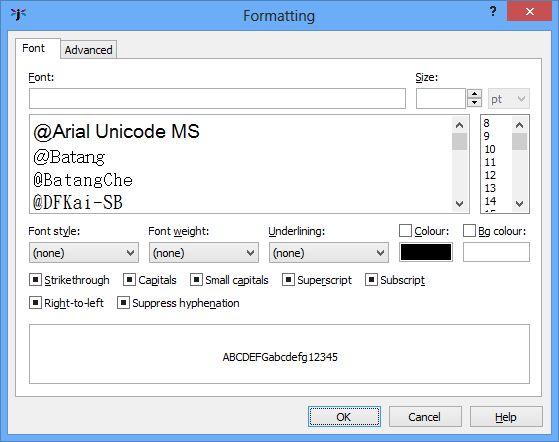
The font dialog
If there are currently no formatting attributes defined for the span of text you have selected, or there are no common attributes for the whole span, you will see that all controls have an ‘undefined’ appearance, as in the screenshot. This means that the text will inherit whatever attributes are defined in the paragraph. If you choose a particular attribute, such as font name, then only that attribute will be applied when you press OK. If your span of text has a particular attribute, such as colour, you can clear that attribute by clearing the checkbox or choosing “(none)” or clearing the control value, depending on the attribute in question.
If you want to remove all formatting for a span of text, then you can use Format | Text | Reset Text Formatting instead of the font dialog. You can select the text whose formatting is to be cleared, or you can click within the formatted text and Jutoh will remove the surrounding formatting. If there is no character formatting at this position, Jutoh will remove the paragraph’s direct formatting.
As per spans of text, paragraphs should be formatted using named styles if possible, which we’ll cover below. But if you need to apply direct formatting, you can use the command Format | Paragraph.
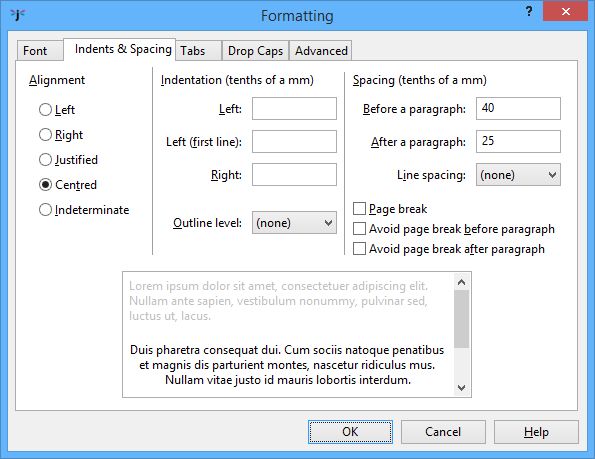
The paragraph formatting dialog
The paragraph formatting dialog contains a Font page as per the character formatting dialog, because a paragraph style specifies a font, which character formatting can override.
The Indents & Spacing page will be the one most frequently used when formatting paragraphs. You can change some of these properties more directly using tools in the Formatting Palette. The alignment and spacing values are discussed shortly.
Jutoh supports most left-to-right languages using Unicode, and you can insert special symbols in several ways:
Use the Format | Insert | Symbols | Symbol (Shift+Ctrl+T) command to show the symbol selector dialog containing all the Unicode symbols (see the screenshot below).
Using View | Auto-Replace Preferences, define symbols that will be inserted when you type a particular piece of text followed by space or paragraph return. For example, by default typing three dashes followed by a space will cause Jutoh to insert an em-dash (—). For more information, see Appendix B: Configuring Jutoh.
Define a symbol as a keyboard shortcut and/or favourite, using View | Customise Shortcuts. A favourite is a style, command or symbol that is defined as a shortcut and also has its Favourite option checked. It will then appear on the Favourites  toolbar button. (If this button is switched off, you will need to enable it using toolbar customisation.) For more information, see Appendix B: Configuring Jutoh.
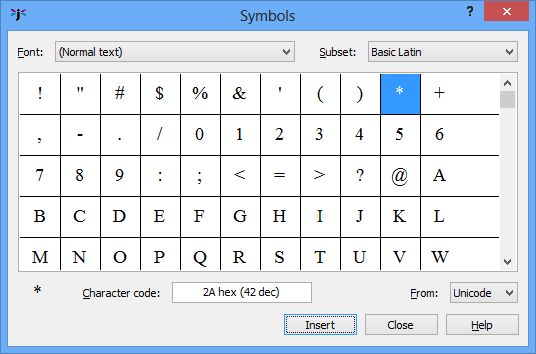
The symbol selector dialog
Note that not all ebook readers support non-English Unicode character sets using their default fonts. To show, say, Romanian diacritics in Adobe Digital Editions, you need to embed a suitable Unicode font (for example, DejaVuSans), and specify a font substitution in your configuration the embedded font is used. For more on embedding fonts, see Chapter 24: Advanced Topics.
You can insert pictures into your document with Format | Insert | Picture (Shift+Ctrl+C), or simply by pasting a picture from the clipboard. If you use the insert method, the picture will be stored in the original file format; if you paste from the clipboard, the picture is stored as a PNG. By default Jutoh will convert pictures to JPEG when you actually generate the ebook, so you don’t generally need to worry about inserting a format that’s compatible with Epub or Mobipocket at time of insertion.
If you insert a picture that’s very large (in dimensions, not file size), Jutoh will resize it at the time of insertion. You can switch this off, and change the maximum size, using the Resize images to max setting in Import Preferences.
A picture is normally shown and edited in Jutoh as simply a character in a paragraph. Typically, a large picture will have its own paragraph. You can adjust properties by clicking on the picture: you can set the relative or absolute picture size or maximum size, whether the image will float to the left or right of other content, margins, alternative text and more.
We’ll go into more detail about images and how Jutoh optimizes them for ebooks in Chapter 10: Working With Pictures.
The ebook reader software will cause page breaks to appear between sections (such as chapters), so you don’t need to insert a break at the start of each section. If you need page breaks to appear within a section before a particular a paragraph, put the cursor on that paragraph and use Format | Insert | Page Break (Shift+Ctrl+E). To remove a page break, use the same command again. A dotted line will appear before the paragraph indicating the location of the break. How page breaks are interpreted visually is up to each ebook reader.
You can insert non-breaking spaces and hyphens with Format | Insert | Symbols | Non-Breaking Space (Shift+Ctrl+Space) and Format | Insert | Symbols | Non-Breaking Hyphen (Shift+Ctrl+-). The non-breaking space is inserted as a Unicode character (160) but since some fonts can’t display the non-breaking hyphen character (8209), this is inserted as an object. If you enable the configuration option Convert non-breaking hyphen to hyphen, Jutoh will generate HTML with a regular hyphen and a span that prevents breaking, to be compatible with more Epub viewers. This is unnecessary for Mobipocket.
Some Epub viewers do not support a non-breaking horizontal bar, which is essential punctuation for Spanish. So if you are writing Spanish, you may wish to enable the configuration option Convert horizontal bar to em dash. This converts the horizontal bar (Unicode 8213) to an em dash (Unicode 8212) and adds a non-breaking span. For the non-breaking behaviour to work, the bar and non-space character to the left or right of the bar must be formatted in the same (or no) character style. (Note that when we talk about conversion, we are referring to the final generation of the ebook from the Jutoh content, not file import. So you can retain the horizontal bar in your Jutoh content and decide at any time whether or not to have it appear as an em dash in your book, without any permanent replacement of the original symbol).
You can also set the configuration option Styles suppressing hyphenation. This is a pattern matching all styles that should suppress hyphenation; the default value is ‘Heading*’, thus suppressing hyphenation for all headings. You can separate multiple patterns with the pipe (‘|’) character.
To add a horizontal rule, for example to indicate a division between scenes within a narrative, use Format | Insert | Horizontal Rule (Shift+Ctrl+B). You will see an object like this:

You can click on object to change properties such as width and colour. These properties won’t be reflected within the Jutoh editor, but will be output to the Epub or Mobipocket book.
You can mark text or a picture with a named bookmark so that a link can point back to it. Use Format | Insert | Links | Bookmark and give the bookmark a unique name, consisting only of alphanumeric characters and underscores. If you select content first, the bookmark will be associated with that content. No extra formatting will be shown, but the cursor will change as you move over it and you will be able to click on it to show the bookmark dialog. If you don’t select content first, a bookmark object will be placed at the cursor, like this:

Note that you don’t need a bookmark for a link to point to a whole section, only if you need to be able to refer to a specific point within a section.
Another type of bookmark is the object identifier. This is the ‘Id’ property in the Advanced page of the property dialog for paragraphs, text fragments and most objects. You can set the identifier for a paragraph using Format | Paragraph, and the identifier for a text fragment with Format | Character. However a more reliable method of setting the identifier for a text fragment (since styling can break a span of text into separate pieces) is to bracket the text with the ‘span’ tag object: see Chapter 16: Working With Tag Objects and Chapter 17: Adding Narration To Your Book.
A convenient way to show all the bookmarks in your current book section is to use the Inspector tab in the Formatting Palette, and select Bookmarks from the drop-down list. You can then click on a bookmark in the list to highlight that bookmark in the editor.
To insert a link within the book, use Format | Insert | Links | Link to Page (Shift+Ctrl+G). You will be shown a document browser – select a section document and, if you wish, a bookmark within that section. To edit or remove the link, just click on the linked text.
To insert a URL (an external web site address), use Format | Insert | Links | URL (Ctrl+K) and type the address.
When you create a page link or URL, the dialog will give you the option of applying a style to the linked text. This style is mainly for editing convenience so you can easily see the links; ebook readers will provide their own styling for links. In order not to clash with the default link styling, when generating the ebook Jutoh will remove attributes (such as colour and underline) if they are also present in the ‘URL’ character style, but you can change this behaviour per configuration.
Automatic bookmarks have the prefix auto_bookmark and may be changed by the Table of Contents Wizard. If you want to make sure that a heading retains a constant bookmark that you can link to manually, change the bookmark to one without the auto_bookmark prefix.
You can control-click on a page link (or alt-click, on Mac) to display the document that is the target of the link, with the bookmarked content selected.
When inserting a URL (not a page link), you normally simply specify the URL address, such as http://www.something.com. However if you want more control (in HTML-based formats only), you can include the entire contents of the ‘a’ tag and Jutoh will output the whole thing. The key is to include the ‘href=’ attribute within the URL. For example:
href="http://www.something.com" onclick="return popitup('http://www.something.com')"
In non-HTML formats, Jutoh will extract the actual URL automatically.
You can insert a footnote using Format | Insert | Links | Footnote (Shift+Ctrl+N), and you will be able to edit the footnote text in a separate dialog. A footnote is represented by this symbol within the text:

Footnotes can either be shown at the end of the section containing the footnote, or as a separate endnotes section. The way footnotes are presented in the generated ebook is determined by settings within the Footnotes & Endnotes tab in the Project Preferences dialog, under Indexes.
Note that a footnote is always styled with the designated footnote paragraph style setting, overriding paragraph styles you use within the footnote editor, unless you choose otherwise in footnote settings.
For more information on footnotes, please see Chapter 11: Working With Indexes.
If you mark your book with index entries, Jutoh can generate an alphabetical index section. Use Format | Insert | Links | Index Entry (Shift+Ctrl+I) and enter the index entry name and, if necessary, one or two subcategories. This symbol will be inserted into the text:

The way the index is presented is determined by settings within the Index tab in the Project Preferences dialog, under Indexes.
For more information about indexes, please see Chapter 11: Working With Indexes.
You can add comments anywhere in your project, by selecting the content you want to comment on and using the menu command Format | Insert | Comment (Ctrl+;) or the Insert Comment  tool. Then click on comment object to edit it, hover over it to view the comment, or use the Inspector tab of the Formatting Palette to list all the comments in the current document.
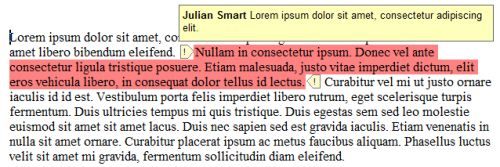
A comment showing its tooltip
If you fill out your user name and initials in Preferences (the General page), they will be associated with new comments.
You can choose to include selected comments in your ebook; by default, comments are not included, except when exporting to ODT. Comments are imported from DOCX and ODT files. For more information, see the topic Working with comments in the Jutoh online help.
Jutoh maintains a style sheet for each project, containing named style definitions that can be used to change formatting in your project. Each style definition (or just style, for short) specifies visual attributes such as italics, colour, alignment, and so on.
Jutoh supports four kinds of named style:
Paragraph style. This kind of style applies to an individual paragraph, and you can see available paragraph styles in the drop-down control above the editor.
Character style. This kind of style changes the formatting for a span of text within a paragraph. You can apply character styles using the context (right-click) menu, choosing Styles and then Character Styles.
List style. This kind of style defines how list items are formatted at each depth; the two list buttons on the formatting toolbar simply apply two of the standard list styles (bulleted and numbered).
Box style. This kind of style applies to images and text boxes, and defines attributes such as margins, padding, border, and background colour.
You can edit these styles, and add new ones, using the Styles page in the Project Properties dialog; or you can use Format | Edit Styles. Style changes will be applied to any open documents as soon as you close the dialog.
Whatever the formatting you apply, Jutoh must always be able to relate it to a named style. So if you use ad hoc styling, such as applying centred alignment using the toolbar, Jutoh will create a new automatic style (or find a suitable existing one), for example ‘Normal + Centre Alignment’. These automatic styles are maintained with each book section document and you can’t edit or delete them manually.
I cannot emphasize enough how important it is to use named styles, not ad hoc styles or automatic styles, wherever possible. This will make it far easier to maintain a consistent format for your book, since then when you need to change the presentation you may only need to change the named styles, and not every relevant paragraph. Also, it makes it easier Jutoh to perform tasks such as table of contents creation because it can search for specific paragraph styles. Having said that, it’s probably not worth maintaining and applying separate styles for occasional use of bold or italics.
When Jutoh creates a new project for you, it creates a default style sheet with such styles as ‘Body Text First Indent’, ‘Heading 1’ and ‘TOC Entry 1’. Some of these styles (such as ‘URL’) are used by features in Jutoh, in the case of ‘URL’ for applying a link style in various situations, for example in a generated table of contents or for a page link. So it’s best not to delete the standard styles unless you really know what you’re doing.
The following lists the styles that are added by Jutoh. The asterisked styles should not be deleted, and the other styles can be replaced by custom styles in various dialogs – but you may wish to play it safe and not delete any of them. By default, certain standard styles will be restored when opening a project. You can turn this behaviour off via Options in Project Properties, by clearing Restore missing standard styles.
Body Text
Body Text First Indent
Bullet List 1 *
Citation
Centre
Drop Caps
Endnotes Group
Endnotes Heading
Headers
Footers
Footnote
Heading 1...6
HTML *
HTML Text *
Index Entry 1...3
Index Group Heading
Index Heading
Normal *
Numbered List 1
Preformatted
Right
Small Caps
TOC Entry 1...6
TOC Heading
URL *
Since you can have multiple style sheets in a project, the style sheet that’s being used and edited at any given moment is the one that’s specified in the Style sheet property of the currently selected configuration. You don’t need to concern yourself with that if you will only be using the default style sheet, but it’s worth bearing in mind in case the Style sheet property is changed accidentally.
When you’re starting a project, think about what styles you’re likely to need, and if necessary create them. A bit of foresight here will save you time later compared with simply applying ad hoc styles.
The formatting palette provides a convenient way to understand, apply and modify the styles in your project. The palette shows a list of styles to the right of your document, similar to the Styles and Formatting pane in Microsoft Word. In this picture below, the ‘Heading 1’ style is being shown, and there’s a description of the details of the style at the bottom:
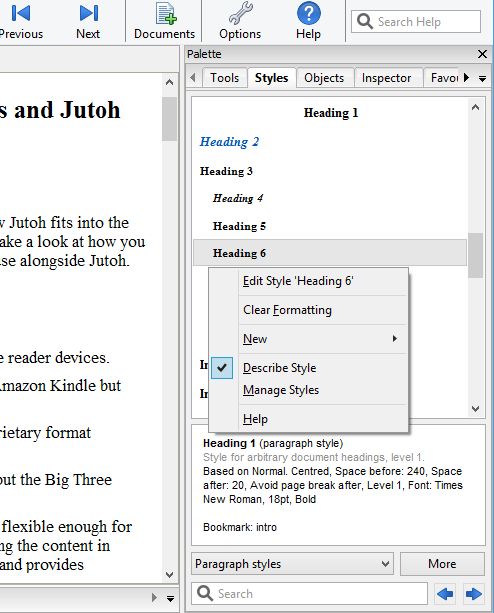
The formatting palette and context/‘More’ menu
You can show or hide the formatting palette using the command Format | Formatting Palette or Alt+P; then click on the Styles tab. There are four other tabs in the palette. The Tools tab shows all the available tools that are also shown on the horizontal toolbar; Objects lists the objects that can be inserted, such as bookmarks, tag objects and tables; Inspector shows selected kinds of content in the current document, such as bookmarks and images; and Favourites shows any styles, commands or symbols that you may have marked as favourites in the shortcut editor (see the next topic).
The formatting palette will only be presented when a document of the appropriate type is being edited; it will also disappear temporarily if you are using the built-in help window, to reduce clutter.
The style that’s highlighted in the list is either the one where your cursor is currently positioned, or the style you have selected in the list with the mouse or keyboard. You can single-click on the styles without worrying about changing your project accidentally; this lets you browse the styles and read descriptions of them in the pane under the list.
To apply a style to the current paragraph or selection, double-click on the style name, or press Shift+Enter after typing in the search control. In the search control, you can cycle through matching styles by pressing the Enter key or the arrow buttons.
A menu appears when you click on More or right-click/control-click over the style list (or press the context menu button on your keyboard, if there is one). This menu contains commands for editing the current style, clearing formatting in the current paragraph, showing and hiding the style description pane, managing your styles (showing the Project Properties dialog with the Styles page selected), and creating new styles.
The Clear Formatting menu command works like Reset Text Formatting in the Format menu, if you have selected some text: character styling within the selection will be removed. It’ll also reset character styling surrounding the cursor if you haven’t selected anything. However if there is no selection and no character styling under the cursor, it will remove ad hoc (direct) formatting from the paragraph. So, for example, ‘Body Text + Centre’ will become just ‘Body Text’. If you select multiple paragraphs, Jutoh will remove both ad hoc paragraph and character styling.
You can choose what kind of styles appear in the list, using the drop-down control next to the More button. By default it shows paragraph styles, but you can also show character styles, list styles, box styles, or all styles.
Especially if you have a lot of reformatting work to do, you’ll appreciate a quick way to apply styles. Press Ctrl+. and then Enter to start editing shortcuts for the styles in your project. Scroll down the list of shortcuts until you get to the styles section; then edit each relevant style and choose a primary shortcut (direct) or secondary shortcut (prefixed with Ctrl+.). You can also check Favourite to have it appear in the Favourites menu, as described above under Special symbols. For more about this, see Appendix B: Configuring Jutoh.
By default, no font information is included in your ebooks so that the ebook device and user can decide what font to use. You can override this behaviour if you really want, by checking the configuration option Generate font names and/or Generate generic font names. However, ebook readers tend to have a limited range of fonts, so if possible, use as few fonts as possible. You’re on safe ground if you use ‘Times New Roman’, ‘Arial’ or ‘Helvetica’, and ‘Courier New’. If you must use different fonts, specify them in the named paragraph style and not on an ad hoc basis (direct formatting).
You cannot use fonts that happen to be on your system and expect them to exist on someone’s ebook reader. If you have unusual font requirements, the only thing you can do is embed a font. For this you need to have a copyright-free font, such as fonts from the DejaVu family. Embed it by adding an Embedded Font Document and specify a font substitution in your Epub configuration, such as Times New Roman: DejaVuSans. For more details, see Chapter 24: Advanced Topics.
If your system doesn’t have a particular font that’s used in the project, then when the project is opened, Jutoh will use a special global string table called Font Substitutions to try to find an equivalent font that is available. If you use fonts not specified in this table, you can add more substitutions: go to Preferences, click Strings, select the Font Substitutions table, and add more strings or edit existing ones to add references to the other fonts. You can also change or disable the table that Jutoh uses via the setting Preferences/Advanced/Font substitution table.
If your book occasionally uses a monospace font such as Courier New, you can set up your Epub or Mobipocket configuration to only output a ‘generic font name’ (a rough indication of the font family) for styles that use this font, whilst outputting no font information anywhere else. This has the advantage of correctly showing monospace content, while letting the device or user decide what font to use for the rest of the book. To do this, add the style name(s) to the configuration option Styles with generic font names. This will work for Kindle and most Epub readers.
If you’re using Linux, you can get the standard Microsoft fonts so that your project files are compatible when switching between operating systems. On Ubuntu, you can find the ‘Restricted extras’ package in the Software Centre, or use this command in a terminal window:
sudo apt-get install ubuntu-restricted-extras
Keep your main content, apart from headings, footnotes, captions etc., at 12pt – this is the point size that Jutoh regards as the ‘default’ size, and which can therefore be left unspecified in the generated ebook. The reader software, and user, will choose the best size. Any font above or below 12pt will be sized relative to the default font, using the HTML ‘em’ unit. The scaling factor to convert a point size in Jutoh to an em size in HTML can be adjusted in the Options panel in Project Properties, should you wish to tweak the way text size is calculated.
Line spacing is the space between lines within a paragraph; paragraph spacing comes in two parts: spacing before a paragraph, and spacing after a paragraph.
To edit spacing for a named style, go to the Styles page in Project Properties (Edit on the main toolbar). Select a style, click Edit and then click on Indents & Spacing.
Paragraph spacing is specified in tenths of a millimetre, which is converted to ‘ems’ for Epub and HTML (see Options in Project Properties for the scaling value). Note that Mobipocket doesn’t register spacing that’s less than 25 tenths of a mm – so if spacing isn’t what you expected, go back and check the values.
Line spacing is specified in multiples of single line spacing, for example 1.2. But in general, you should avoid specifying any line spacing since it can cause display problems or override user settings. You can switch line spacing off for the whole book by clearing the configuration option Generate line spacing.
Don’t be tempted to simply leave a blank paragraph to get inter-paragraph spacing; some reader software may ignore this and it will be very hard to change your project if you decide to use less or no inter-paragraph spacing. The exception to this is the title page and other cases where you need more than the usual spacing; but even here it’s best to use a special style for each kind of vertical space, so you only need one blank paragraph at a time.
First and subsequent line indentation for the left margin can be specified in a style, again under Indents & Spacing in the style editor. So a hanging indent can be achieved by specifying, say, 0 for the first-line indent, and 60 for the normal indent, where the values are in tenths of a millimetre.
You can also specify the right indent, though it’s rare to need to do that. Again, the value is specified in tenths of a millimetre.
Don’t use tabs for indentation! Tabs are ignored in HTML-based formats.
Paragraph alignment (left, right, centred, justified) can be specified in the Indents & Spacing tab in the style editor, or via the Format menu and toolbar commands. You can choose left alignment or justification for the majority of your content, but note that Kindle is the only major platform that respects the alignment as specified in the book; other ereaders have a global justification setting that affects all books.
For list items, it can be better to force left-alignment since a short list item looks terrible when justified.
Note that if you justify text, it won’t show as justified in the Jutoh editor. However it will be justified when viewed in an ebook reader where supported.
You can specify that a paragraph should have drop caps (the first letter or few letters enlarged with lines wrapping around it) via the Drop Caps page in the paragraph formatting or style dialog. You can specify the number of lines the drop caps should take up, the number of characters to format (or the first whole word), and an optional character style to use. You can also specify optional CSS properties to replace the Jutoh-generated code. Jutoh generates different ebook code according target (Kindle or Epub/HTML) but drop caps should be used with caution as the drop caps rendering varies slightly with device settings such as font face name and text size.
If you use heading styles of the form ‘Heading 1’ then Jutoh will output the styles with the HTML heading tag (such as ‘h1’). To use a different prefix, or to stop Jutoh from emitting ‘h...’ tags, edit the Heading style prefix configuration property.
For finer control of how heading styles map to HTML levels, see Chapter 20: Making Your Books Accessible.
List styles are the only way to achieve bulleted or numbered paragraphs; you shouldn’t try to apply bullets to an individual paragraph, although the Bullets page of the paragraph style editor is retained in case you imported a bulleted paragraph and need to reset the attributes.
List styles work on the principle that lists can potentially be nested, with different bullet or numbering styles depending on the level (depth) of the list. When you are editing a list, pressing the Tab or Shift+Tab keys will increase or decrease the level of the current paragraph in the list. It is dependent on the particular ebook reader whether the particular bullet or numbering style will be honoured, so you may see a different style in the ebook than in Jutoh.
The Bulleted List  and Numbered List
  buttons in the toolbar apply the styles called “Bullet List 1” and “Numbered List 1” respectively. To apply a different list style, use the Format | Bullets and Numbering menu command, which will give you a choice of list styles to apply, along with the option to renumber the list.
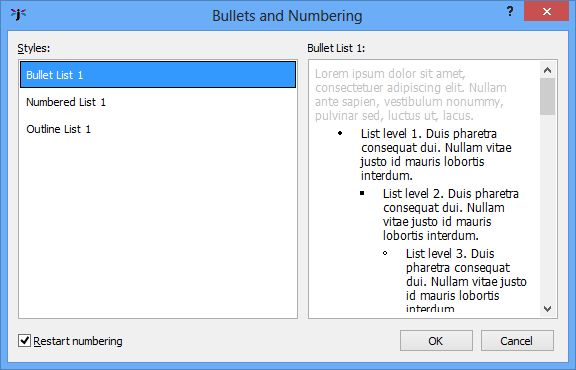
The Bullets and Numbering dialog
You can renumber a list without choosing a style, using the Format | Renumber command, and you can remove list styling from one or more paragraphs by clicking on a bullet or numbering toolbar button.
Non-contiguous list numbering is possible by repeated use of Format | Renumber, specifying the start number, but not all ereaders support this and it can cause EpubCheck errors, so use with caution and be sure that your ebook distributor doesn’t reject the file due to failing EpubCheck.
For any given paragraph in a list, both the paragraph style and list style are used. However, the indentation from the list style overrides any indentation in the paragraph style.
You can have multiple paragraphs per list item by placing the editor cursor just behind the bullet or number, and hitting the backspace key. This will turn the item into a ‘continuation’ paragraph without a bullet or number but with the same indentation as a regular list item. Note that for Mobipocket output, this is simulated by putting line breaks between list paragraphs since genuine multiple list item paragraphs are not possible in KF7 format. Jutoh will make an attempt to convert indented paragraphs in DOCX documents to continuation paragraphs according to the context, but if this is tripped up by complex formatting you will need to correct it within Jutoh by applying a list style and then ‘deleting’ the bullets.
Another way of creating list-like formatting but without using list styles is to use an indented paragraph style with a non-indented heading for the item heading. For example:
Apples
Apples are roundish in shape, and crunchy.
They come in a variety of, well, varieties, with Granny Smith being one of the most popular.
Bananas
Unlike apples, bananas are long, bendy and squishy.
They have their own convenient wrapper utilising a zip-like mechanism, and all too soon they turn black.
For more on list styles, see Chapter 12: Working With Style Sheets.
You can add keywords to your text, and if the configuration property Replace strings in content is enabled, keywords will be replaced by values in the compiled book. Keywords can come from string tables that you create, and also from your project metadata. The following metadata keywords are predefined:
%TITLE%, %ID%, %LANGUAGE%, %AUTHOR%, %CONTRIBUTORS%, %PUBLISHER%, %URL%, %SUBJECT%, %DESCRIPTION%, %DATE%, %RIGHTS%, %COVERAGE%, %TYPE%, %FORMAT%, %SOURCE%, %RELATION%
This can be a useful facility if you wish to provide different editions with only slightly differing content, or to allow quick editing of text used throughout the book, or to abbreviate a long piece of text such as an HTML fragment. Keyword names are case-sensitive and each keyword must be formatted with a single or no style. You can read more about string tables in Chapter 13: Working With String Tables.
Although this isn’t directly related to formatting, it’s important to know how to edit properties associated with each book section document. To show the Book Section Properties dialog, you can do any one of these:
Right-click (or control-click on Mac) over the title of the book in the project outline and click on Properties.
Choose the Document | Document Properties menu command.
Press Shift+Alt+Enter.
Click on the Document Properties  toolbar button.
In the Project Properties dialog, click Document and then Edit Document Properties.
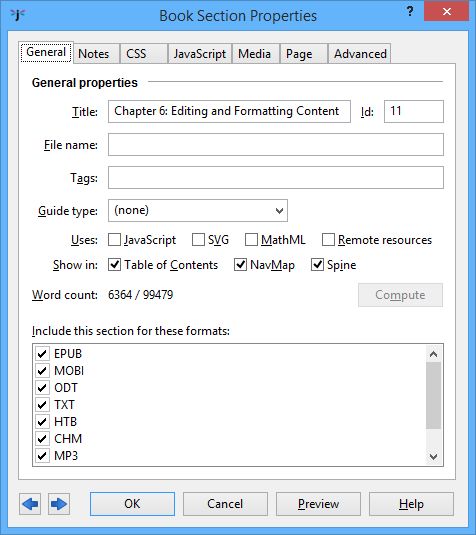
The Book Section Properties dialog
Here, you can edit the title of the document, the guide type (see Chapter 24: Advanced Topics for information on guide types), an optional HTML file name, tags, whether to show the document in the table of contents, NavMap and spine (Epub/Mobipocket only), whether to include the section for a particular file format, and notes for this document.
You can add tags to allow for conditional inclusion of exclusion of the section in your ebook: for more on that, see Chapter 23: Conditional Formatting.
You can also see the word count for this document and the whole project (by clicking on Compute), and you can see the unique identifier of this document (not editable).
For more advanced use, there are tabs for extra CSS for this document, JavaScript code, timings for synchronising narration with content, and further properties for specifying an Epub type (for Epub 3 ebooks), JavaScript event handlers, and more.
You can view your entire ebook by pressing Compile and then Launch to show the book in the default viewer application. However, this can be slow if you just want to see the results of a small change. So instead, you can use Book | Preview Section (Alt+/), and Jutoh will show the HTML of the current book section in your web browser, having written the HTML and relevant resources to a temporary folder (see the screenshot below). This won’t be exactly as the book will appear in various ereaders, but it will be close. Use a separate browser window sized appropriately and placed in front of your regular browser window, so the preview doesn’t interfere with your normal web browsing.
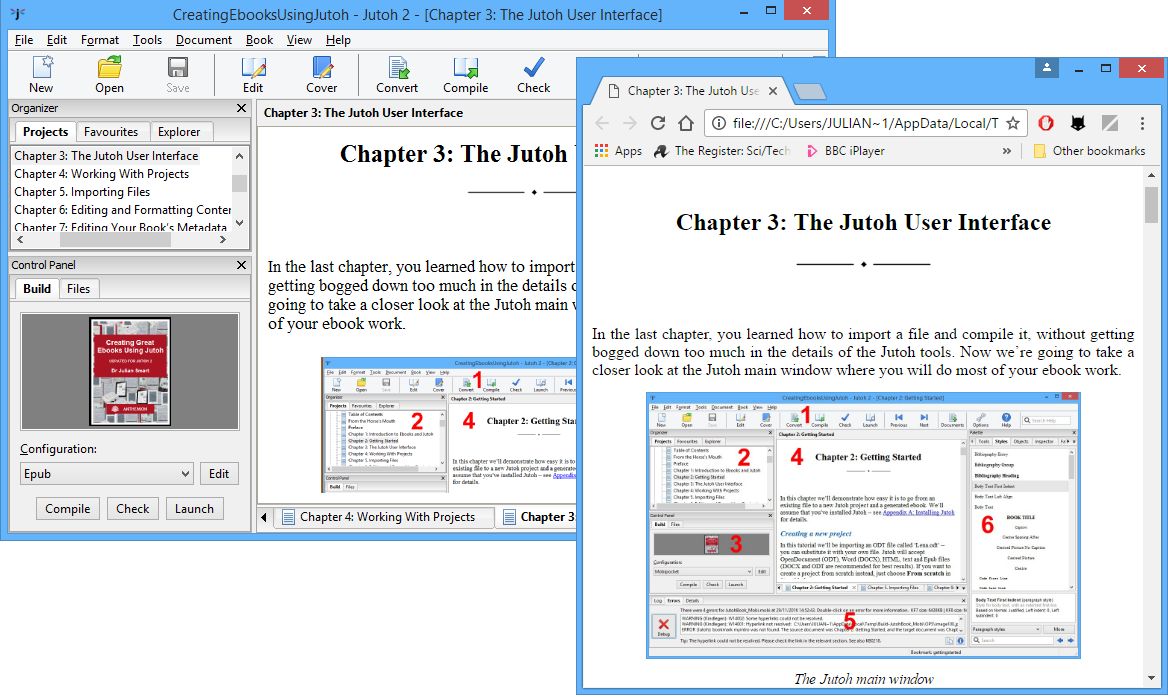
Previewing a Jutoh book section using Chrome
For further previewing and testing suggestions, search for KB0118 (‘How can I test my Epub and Kindle books?’) in Jutoh help.
Now you’ll have a good idea of what’s possible with content editing and formatting, and how to accelerate your typing and styling using shortcuts and favourites. You can read more about styles in Chapter 12: Working With Style Sheets. It’s worth repeating an essential point: create and use named styles wherever possible, and don’t use ad hoc formatting. When you come to tweak your book formatting, you’ll be glad if took this advice and planned ahead, rather than having to make potentially thousands of changes in your document.
Next, we’ll look at editing the project’s metadata – the information describing the book.
Contents | Start | End | Previous: Chapter 5. Importing Files | Next: Chapter 7: Editing Your Book’s Metadata