
Contents | Start | End | Previous: Appendix A: Installing Jutoh | Next: Appendix C: The Jutoh Box Model
There are many ways to configure Jutoh to suit your use of it, whether it’s telling Jutoh how to launch helper applications, or changing behaviour such as automatically checking Epub files after creation. We’ll describe the most important configuration options here, and you can find more by exploring the pages of the Preferences dialog.
A ‘viewer application’ is simply third-party software that can display an ebook file that Jutoh creates. Examples include Adobe Digital Editions, Kindle for PC, and Kindle Previewer. If an application knows how to open a file that’s passed to it, then Jutoh can run the application passing it the ebook file name, and the file will be shown in the helper application. You can set Jutoh up to know about as many viewer applications per file type (such as Epub) as you like. If you do this, Jutoh will show you a menu of available applications when you click on Launch after compiling an ebook. You can configure the applications using the Helpers page in the Preferences dialog, shown below:
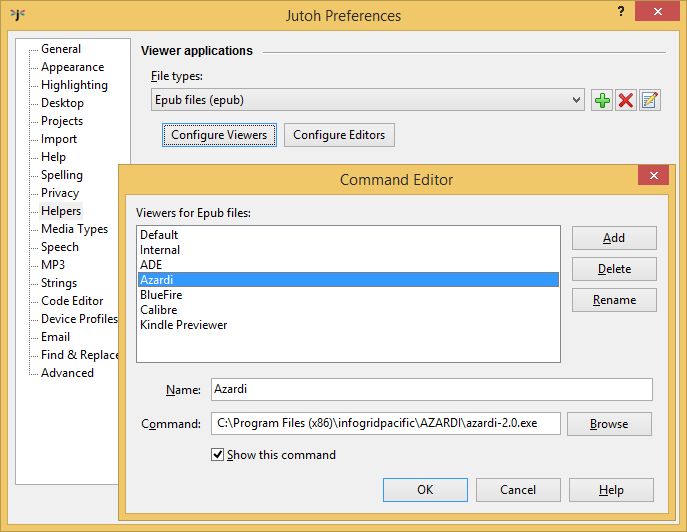
Configuring commands for Epub
Here, we selected Epub files (epub) and clicked on Configure. To add a new application, click on Add and enter the application name and full command path. The Default application is always present and means, run the application currently associated with this file type by the operating system. If only one application is defined for a file type, then a menu will not be shown when launching the application for that file type.
The following screenshot illustrates what happens when several Epub viewers have been defined, and the user clicks on Launch. The Default helper has been disabled so it does not appear in the menu.
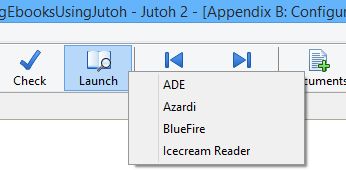
Clicking Launch with several viewer applications defined
Note that this mechanism relies on applications accepting file names on the command line; most do, but a few don’t, such as the Nook viewer, and in these cases you will need to use the application’s user interface to view the book.
Jutoh uses a number of third-party applications to help it create and check books. The Epub checker command is already configured, but if you wish to create Mobipocket files, you will need to configure Kindlegen. These commands are specified in the Helpers page of the Preferences dialog.
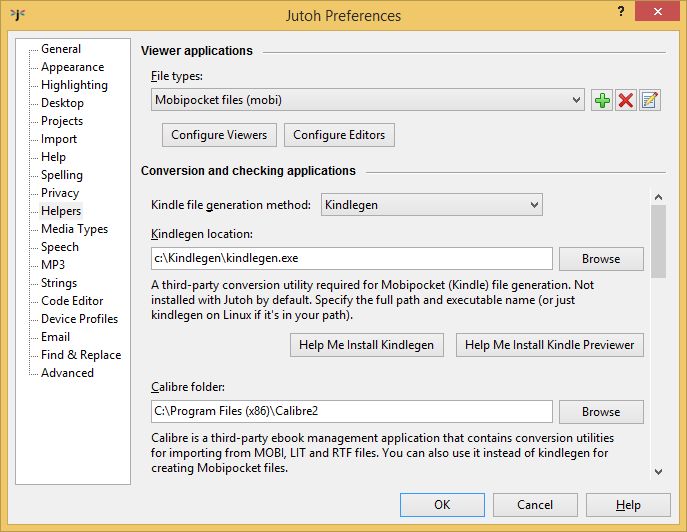
Configuring Jutoh helper applications
When configuring the Java checker application EpubCheck, you can use $APPDIR$ to denote the folder in which the Jutoh application is found. You need to specify a full Java command, such as:
java -Xss1024k -jar "$APPDIR$\epubcheck-1.1\epubcheck-1.1.jar"
The “-Xss1024k” argument is necessary to increase the Java stack size because EpubCheck has become rather large.
To configure Kindlegen, click on Help Me Install Kindlegen in the Preferences dialog under Helpers, or in the Setup Wizard. Since Amazon no longer distributes Kindlegen separately, Jutoh will configure Kindlegen from the Kindle Previewer location if it’s installed, since Previewer comes with its own Kindlegen.
On Windows, the button Help Me Install Kindle Previewer will also help you download, install and configure Kindle Previewer for Jutoh – which is much easier than doing it by hand! On Mac, this button will prompt you to download and install Previewer manually, before configuring Jutoh automatically for use with Launch.
If you wish to generate speech files using Jutoh, or have Jutoh read the current document, you can select a text-to-speech engine in the Speech page of the Preferences dialog. Normally you choose Microsoft SAPI on Windows and the Apple Speech Manager on Mac, but you can also choose the CereVoice or Cepstral engines if you have appropriate voices installed, and eSpeak is another option. On Linux, only CereVoice, Cepstral and eSpeak are available. In the Speech page, you can choose and test the voice to use.
CereVoice is a high-quality TTS system from CereProc in Edinburgh, coincidentally also Jutoh’s home city. On Windows and Mac, you can use SAPI or the Apple Speech Manager to access CereVoice. On Linux (and on Windows and Mac as an optional alternative), you will need to download the CereVoice command-line program for Jutoh to use. Download one of the CereVoice archives on the Jutoh download page, and unpack it to a convenient location on your hard drive. Now go to the Jutoh Preferences dialog, click Speech, and choose the CereVoice speech engine. Click Properties, and specify the location of the cerevoice executable on your system.
When using the external CereVoice program, Jutoh should automatically find any installed SAPI or Apple Speech Manager voices when you click the Properties button. Or, you can manually add voices and their licences from the CereVoice properties dialog. To use CereVoice on Linux, you will need to have access to a Windows or Mac box to purchase and install the voices and then copy them to your Linux box. On Windows, you might find CereVoice files in a location such as C:\Program Files (x86)\CereProc\CereVoice Heather 3.2.0. On Mac, they may be in /Library/Speech/Voices/CereVoice xyz/Contents/Resources/voice.
If you need a version of Jutoh with CereVoice SDK integration as an alternative to the SAPI/Apple Speech Manager/command-line CereVoice methods, please get in touch.
You can use Cepstral voices through SAPI or Apple Speech Manager, or you can download the installer for the external program to use with Jutoh. The program comes with a demo voice which will need to be unlocked by purchasing a licence. After installation, go to Jutoh’s Speech Preferences, select Cepstral, and click Properties. Then specify the path of the swift program in the Cepstral installation folder.
eSpeak is a fairly rudimentary text-to-speech system, but it’s free so it’s useful if you don’t have an alternative. On Windows, if you wish to encode MP3 files with eSpeak instead of using the built-in SAPI voices, you can download the installer from espeak.sourceforge.net/download.html and run it. Then configure Jutoh for using eSpeak in the Speech tab of the Jutoh Preferences dialog. Select the eSpeak engine, and click Properties. You will need to specify the full path of the espeak.exe executable.
On Mac, to use eSpeak instead of using the built-in Apple Speech Manager voices, you can download the zip file from espeak.sourceforge.net/download.html. Once you’ve unzipped the files, you need to copy the espeak-data files to either your home directory, or to /usr/share. So assuming you downloaded the zip file to, say, /tmp, you might then do this in a terminal window:
cd /tmp
unzip espeak-1.37.zip
cp -r espeak-1.37 /Applications/espeak-1.37
cp -r espeak-1.37/espeak-data ~/espeak-data
# Clean up
rm -f -r espeak-1.37
rm espeak-1.37.zip
Now you can configure Jutoh in Speech Preferences to use the binary file /Applications/espeak-1.37/speak.
If you wish to use eSpeak on Linux, you can download a zip file from espeak.sourceforge.net/download.html and unzip it as above. Then configure Jutoh for using eSpeak in the Speech tab of the Jutoh Preferences dialog.
If you wish to encode MP3 files, you will also need the LAME MP3 encoder.
On Windows, download it from lame.sourceforge.net/links.php#Binaries and set the full path of the LAME executable (lame.exe) in the MP3 tab of the Jutoh Preferences dialog.
On Mac, you can get a package file containing LAME for Mac from the Thalictrum web site, at www.thalictrum.com/index.php?pageid=2.
Run the .pkg file that appears on the desktop. The lame command will now be available, and you need to set /usr/local/bin/lame as the executable in the Jutoh MP3 Preferences page.
On Linux, you can get and install LAME using your favourite package management software. For example:
sudo apt-get install lame
Or, you can get a binary or the source code from lame.sourceforge.net.
After installing, the lame command will now be available, and you just need to set lame (no full path required) as the executable in the Jutoh MP3 Preferences page.
Shortcuts and favourites give you quick ways to execute commands, apply styles and insert symbols. This can save you from a lot of tedious mousing and clicking, especially when tidying up formatting in a long document.
Jutoh allows you to customise the keyboard shortcuts used for:
applying commands that you can find in the menubar;
applying named paragraph and character styles to the current paragraph or selection; and
inserting symbols or text into the active editor.
Jutoh defines two kinds of shortcut: primary and secondary.
A primary shortcut is a shortcut that you type directly, such as Ctrl+O to open a project file.
Because primary shortcuts are in short supply, you can also define secondary shortcuts that are prefixed with a primary shortcut. Jutoh defines Ctrl+Period to be the prefix for secondary shortcuts. So, for example, if you defined the secondary style shortcut Ctrl+1 for “Heading 1”, you would type Ctrl+Period Ctrl+1 to apply that style.
When you type the prefix shortcut, Jutoh shows a little window called the Secondary Shortcut Window.
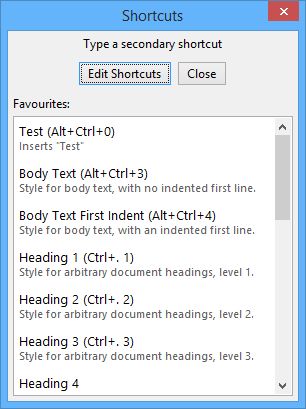
The Secondary Shortcut Window
As a convenience, favourites are shown for quick access. Now this window is showing, you can type a secondary shortcut and the window will disappear after the command is executed; or you can click on Edit Shortcuts to customise shortcuts. This will show the Shortcut Customisation dialog, from which you can view existing shortcuts, edit individual ones, or reset all shortcuts to their default values.
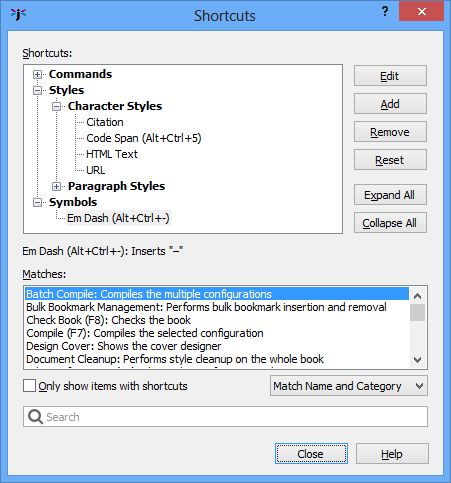
The Shortcut Customisation dialog
When you edit shortcuts, you’ll see all the named paragraph and character styles for the currently-selected project (excluding automatic styles). If you make changes to the shortcuts for these styles, they will be saved with the project. In contrast, command and symbol shortcuts are global.
All available commands and styles (whether they have associated shortcuts or not) appear in the shortcut customisation dialog, so you don’t need to add these. However you need to add any symbol shortcuts that you need with the Add button. By default, there are no symbol shortcuts defined.
When you click on Add or Edit, the Edit Shortcut dialog is shown, as pictured below:
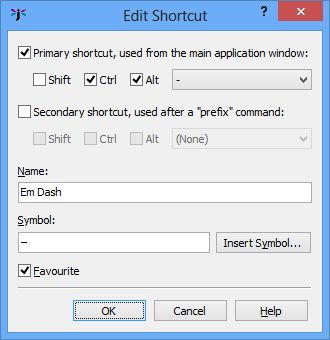
The Shortcut Editor dialog
You can specify the primary and/or secondary shortcut key combinations, and whether the shortcut should appear on the Favourites menu (see below). If the shortcut is a symbol shortcut, for inserting one or more text characters, you can also type the text in the Symbol field, or select it from a grid of Unicode symbols by clicking Insert Symbol.
Global shortcuts are saved to the file shortcuts.dat in the application settings folder (see Jutoh Files for details), so another way of resetting command shortcuts is to delete this file before running Jutoh.
Another way to save time is to enable the Favourites button on the editor toolbar (right-click on the toolbar and select Customise, or use the View | Customise Toolbars command and select the Text Section toolbar).
Now click on the Favourites  button; you will be asked if you want to edit the favourites. If you answer Yes, you will be shown the shortcut editor. Select a command, style or symbol that you want to be on your list of favourites, and check the Favourite control. Press OK to dismiss all dialogs and click on Favourites
  . You will now be shown a menu containing the commands, styles and symbols you chose, as follows:
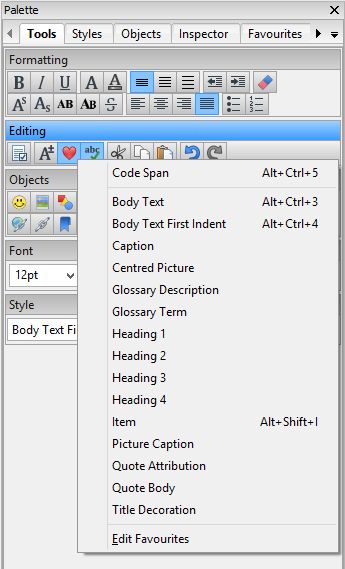
The Favourites menu
In this example, you can see that we have a command (Batch Compile), a character style (Code Span), several paragraph styles, and a symbol shortcut (Em Dash). Any primary shortcuts are displayed next to the item names.
You can also view and use favourite shortcuts in the Favourites tab of the Formatting Palette:

The Favourites tab in the Formatting Palette
Most of the toolbars in Jutoh can be customised; that is, tools can be switched on or off, and in the case of the main toolbar, the text labels can be switched on or off. You can use View | Customise Toolbars to view the Customise Toolbar dialog:
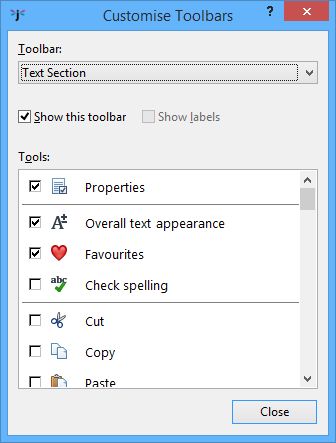
The Customise Toolbars dialog
Select the toolbar to customise using the drop-down Toolbar control. Then click on the checkbox next to each tool name to enable or disable that tool. You can’t change the ordering of tools; separators will be removed automatically if a whole group of tools is disabled.
Another way of showing the Customise Toolbars dialog is to right-click on a toolbar and select Customise from the context menu. It will select the appropriate toolbar.
Auto-replace allows you to type text and have it replaced by a different symbol or sequence of symbols. To edit auto-replace items, use the View | Auto-Replace Preferences command. The Auto-Replace Preferences dialog has two tabs: one called Replace with general textual replacement options, and one called Custom Quotes.
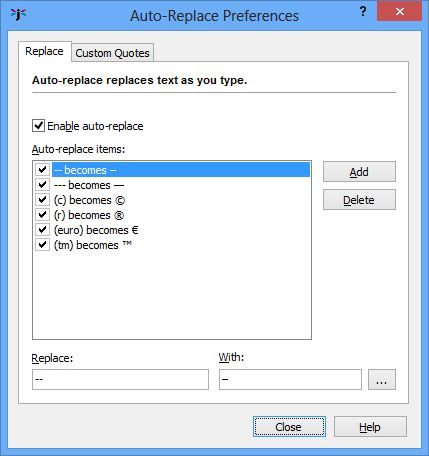
The Auto-Replace Preferences dialog
To add an auto-replace item, click Add and enter the Replace and With text. Click on the “...” button to use a symbol selection dialog that shows all the possible Unicode characters.
Auto-replace works when you have entered the target text and then a space (or punctuation followed by a space). Jutoh will search back and see whether the text matches any in its list, and if so, replaces it with the appropriate text. For example, typing (c) will insert the symbol ©.
Replacing quotation marks is a special case and has its own tab:
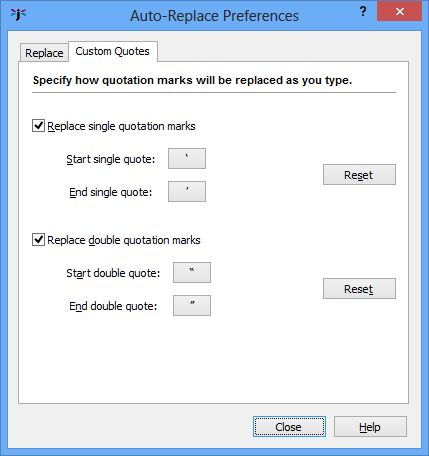
The Custom Quotes tab
This dialog specifies how single quotation marks and double quotation marks are replaced when you type the standard quotation marks with the keyboard. Jutoh recognises whether the mark is at the start or end of the text. Click on the buttons to select the symbol that will be used in each case, using the symbol selection dialog. You can use the Reset buttons to revert the values to their original settings.
You can adjust various settings relating to Jutoh’s appearance using the Appearance page in the Preferences dialog:
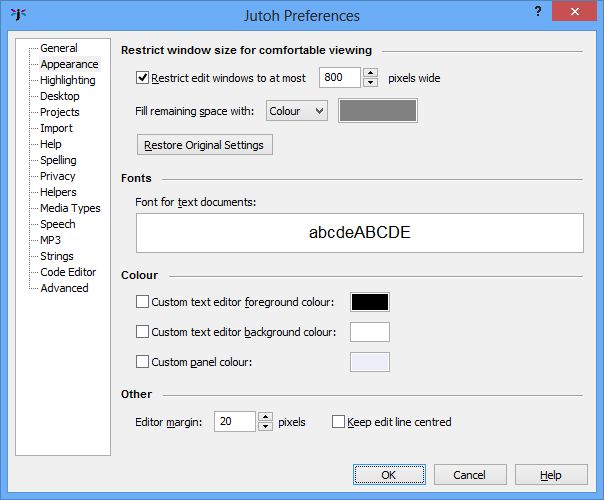
The Appearance Preferences page
Here, you can:
set the maximum width of the editing window;
set the colour of the editor surrounding background;
set the text size for the editing (this will not affect the generated ebook text size);
set the text editor text and background colours;
set the margins around the text editor (to give you more ‘breathing space’);
opt to centre the text cursor vertically as you move around the text.
These settings are global, so they apply to all styled text editors in Jutoh, in all projects on this machine.
The Jutoh desktop (accessed via the Desktop tab near the bottom of the Jutoh window) is a handy place to store third-party tool shortcuts, links to documents, and ‘sticky’ notes. You might not use it all, but if you do, you can tailor various aspects about it from the Desktop page in the Preferences dialog:
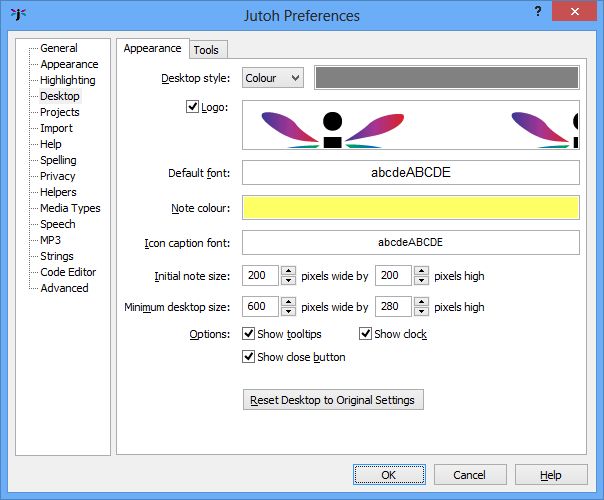
The Desktop Preferences page
You can change the desktop background, the logo displayed on it, the font and colour used for ‘sticky’ notes, and various other settings. You can also change the settings back to the original defaults.
There is a Tool tab in this page that lets you add and remove tools that will be placed on the desktop (and also on the Tools menu on the Jutoh menubar). For more details, click on the Help button on the Preferences dialog..
You can change behaviour relating to project handling (not per-project settings: that’s the job of the Project Properties dialog) using the Projects tab in the Preferences dialog.
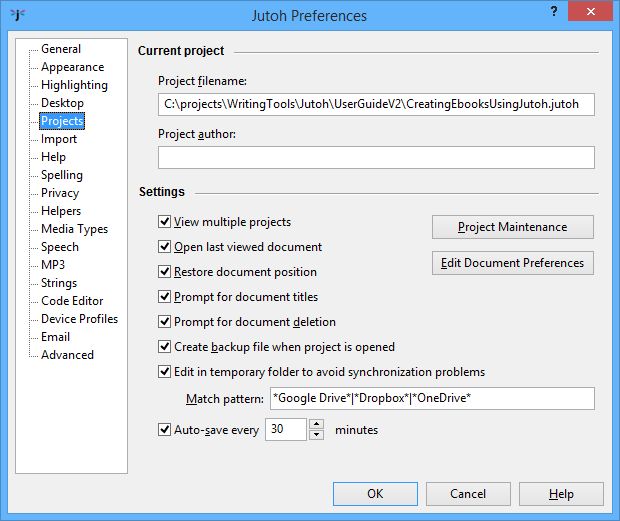
The Projects Preferences page
If you want to allow Jutoh to have several projects open simultaneously, rather than close the previous project when opening another, check View multiple projects.
If you want Jutoh to create a backup before editing a project, check Create backup file when project is opened.
Using Edit Document Preferences, you can change the auto-saving and tab creation behaviour of classes of document. For example, you can specify that book section documents should reuse a single tab instead of spawning a new tab for each document. It’s fairly unlikely you’ll want to change these settings.
The Project Maintenance button shows a dialog for cleaning up a project. In this dialog, you can:
Delete troublesome documents without opening them.
Delete individual records in the project database, in particular ‘orphan’ documents that are no longer in the project index (this occasionally happens when Jutoh is closed unexpectedly).
Compact a project that has been fragmented by much document creation and deletion.
It is recommended that you back up your project before doing project maintenance.
The General page in the Preferences dialog has a variety of useful settings for changing the way Jutoh behaves:
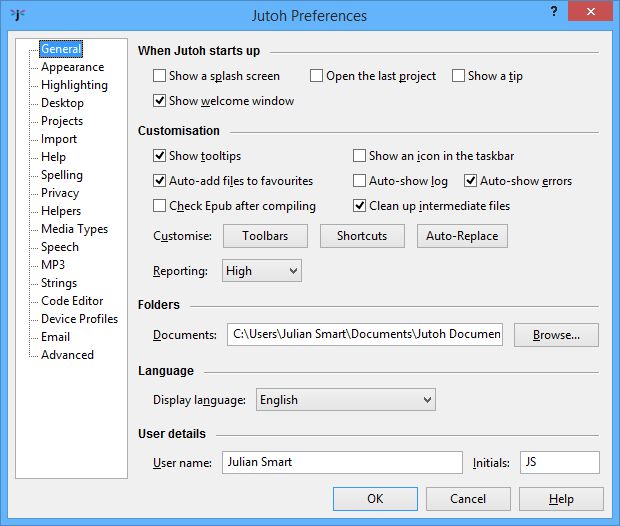
The General Preferences pages
Here, you can switch off the opening ‘splash screen’ and/or the startup tips, and elect whether to automatically open the last project when starting Jutoh.
There are further controls for showing tooltips, enabling the Jutoh Desktop, and whether to add projects to the Favourites window automatically. The Reporting control lets you choose how much detail is shown when compiling, and Show log window automatically specifies whether to show the Log window as soon as you start compiling a project – handy if you want to hide the Log window when you’re editing.
An option you may well want to enable is Check Epub after compiling, so you can guarantee you’ve always checked your Epubs with EpubCheck without having to remember to press Check.
You can specify the default document folder, and you can choose the user interface display language – currently English, French, German and Dutch.
Finally, you can add a user name that will be used to fill in the author name for new projects, and initials that will be added to comments inserted in your content.
Contents | Start | End | Previous: Appendix A: Installing Jutoh | Next: Appendix C: The Jutoh Box Model