
Contents | Start | End | Previous: Chapter 13: Working With String Tables | Next: Chapter 15: Working With Boxes
This chapter describes how to create and edit tables in Jutoh for presenting tabular data.
You can create tables within Jutoh, or import them from HTML/Epub, DOCX and ODT, and include them in your generated ODT, Epub and Kindle files. Supported features include:
border and cell background colour;
several border line styles;
column and row spanning;
an editable gallery of table templates;
arbitrary content in cells including graphics and nested tables;
multiple cell property editor and table property editor.
Don’t expect to use all of the advanced table features in your favourite word processor, such as shading, fancy border styles, and vertical text. But you can still create a wide range of table appearances, and Jutoh’s table tools should be more than sufficient for all but the most demanding user.
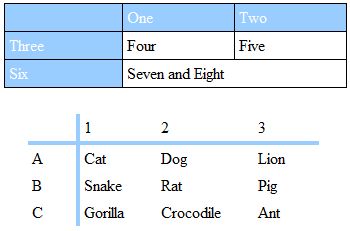
Simple examples of tables in Jutoh
To create a table, use the Format | Table | Insert Table menu command, or the Ctrl+Shift+A keyboard shortcut, or click on the New Table button on the toolbar. This will show the Insert Table dialog, as illustrated below.
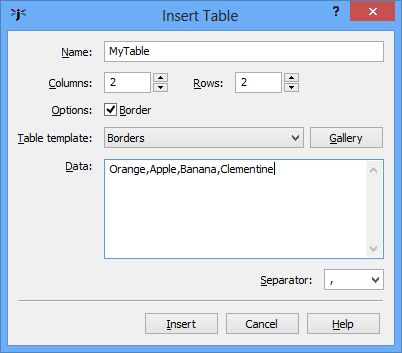
The Insert Table dialog
From here, you can choose the number of rows and columns in your table, and also choose from a gallery of table templates if you wish by clicking on the Gallery button or using the drop-down list of templates.
If you selected text before adding a table, the text will be assumed to be data that you wish to add to the table cells, separated by commas or other separator that you specify. You can also enter the data yourself in the Insert Table dialog.
Jutoh provides a standard set of templates from you to choose from, but you can add your own if you wish. This is what the Table Template dialog looks like when you press Gallery in the Insert Table dialog:
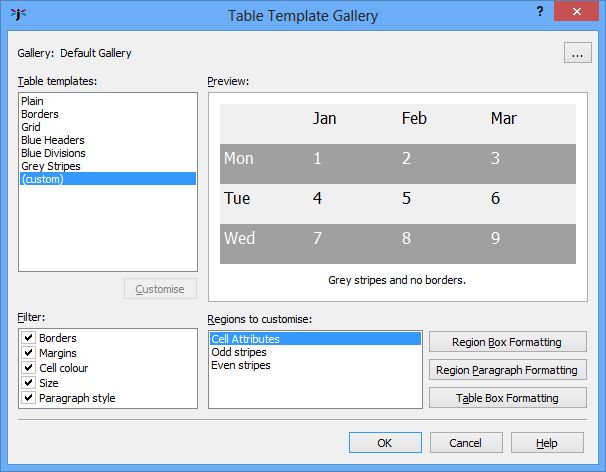
The Table Template dialog
If you press Customise, as has been done in the example, the dialog will show the regions that comprise the table template, which can be edited by adjusting colour, spacing, and so on. Click Region Box Formatting to adjust box attributes such as size, line colour and spacing for the selected region, and click on Region Paragraph Formatting to choose font and paragraph formatting attributes for that region. Click Table Box Formatting to edit table-wide properties such as overall size. Changes will be reflected in the preview.
You can also choose to omit some properties of the table template, such as cell colour, by clearing items in the Filter list.
To edit your table, use the following:
the Table Properties dialog via Format | Table | Table Properties or the Table command on the editor context menu;
the Cell Properties dialog via Format | Table | Cell Properties or the Cell command on the editor context menu;
the various editing commands on the Format | Table menu or the Table Formatting menu on the editor context menu.
From the Format | Table menu, you can add and delete rows and columns, merge and split cells, change row and column dimensions, and change vertical alignment in cells.
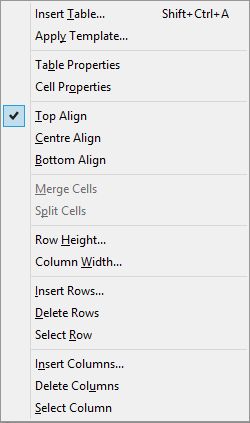
The table formatting menu
You can often save time by selecting a group of cells for paragraph or cell formatting operations. If you select a group of cells before invoking the Table Properties dialog, this group of cells will be edited instead of the overall table. Similarly, selecting several cells before invoking the Cell Properties dialog will format the selected cells.
You cannot select rows, columns or the whole table with one click, as you can with some word processors. However you can use the mouse to drag a selection of multiple cells, and you can use the Format | Table | Select Row/Column commands.
Here is an example of using the Table Properties dialog:
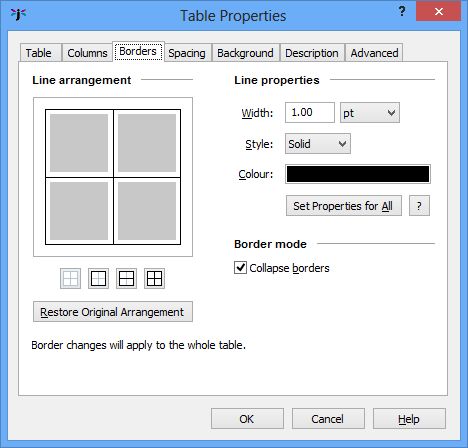
The Borders page of the Table Properties dialog
The Borders page is the most complex aspect of the Table Properties dialog and deserves detailed explanation here. For further help on this and other aspects of the dialog, click on the Help button.
This page shows a summary of the borders surrounding the table, and the horizontal and vertical dividers. Since these can vary throughout the table, it is an approximation based on a sample of borders, but you can select a group of cells and change the borders for that group if you need to change specific borders and dividers. The dialog reminds you what rows and columns any changes will apply to – in the example above, changes will apply to the overall table.
The borders will only be applied if they were changed in the dialog, which means you can’t accidentally change the table simply by showing the dialog and pressing OK.
Clicking on a border line cycles through three states: ‘on’, ‘off’, and ‘no change’ (indicated by a thick grey line). When you choose the ‘on’ state by clicking one or more times, it will take on the new line properties as specified in the Line properties group of controls. Alternatively, right-click or control-click on a line to have it immediately take on the current line properties instead of cycling through the three states.
If you want the line property controls to reflect the state of one of the lines, shift-click on that line.
To set the current line properties for all lines that are currently present, use Set Properties for All.
Note that this page uses cell borders to achieve an overall table border. You can set an additional table border via Box settings in the Table page, but this will only work for HTML-based formats.
You can influence the size of columns, rows and the table itself in a variety of ways:
specifying cell width and height in the Cell Properties dialog;
specifying column and table width in the Table Properties dialog;
specifying row and column size using menu commands;
adding content to fill out the column or row;
specifying whether a cell should wrap text (break it into lines);
adding padding (spacing between the content and the border).
You can’t currently change the sizes of columns and rows by dragging their dividers, but you can achieve the same result by specifying column widths and row heights using the table formatting commands and the Table Properties dialog. Specifying the size of a single cell may have an impact on the row or column size, depending on whether it changes the maximum row or column size.
If you wish cells to calculate their size from their content, you can specify zero in the column width and row height commands, or in the Columns page of the Table Properties dialog, or by clearing width and height settings in Cell Properties.
You can specify whether cells should wrap their text (break the text into lines) in the Spacing page of the Table Properties dialog. This may be overridden if there is not enough space to show an unbroken line of text.
You should generally specify padding for cells, that is, the space between the content and the border of the cell. Otherwise the table will looked cramped. Specify padding in the Spacing page of the Table Properties dialog, or in the Cell Properties dialog.
Specifying minimum and maximum sizes for cells in Cell Properties won’t have an effect in the editor, but ereaders may use these values.
To understand more about the relationship between content, padding and borders, refer to Appendix C: The Jutoh Box Model.
If you have specified absolute sizes for cells or tables in centimetres – quite likely after importing from a word processor file – you may find the tables are too large for small ereader displays, or they are not in the proportion originally intended relative to the display width. It can be better to use percentages, and you can apply this to all tables, boxes and images when exporting ebooks by checking the Replace absolute widths configuration option. Jutoh will use the paper size and left and right margins defined in the configuration (or the parent object’s width, if it’s an absolute value) to calculate a percentage width for a given object width.
When creating a table with borders, you may wonder if you need to add every border of every cell, given that the side of one cell can act as the side of an adjacent cell. You can actually do either – supply all borders, or just the ones necessary to give the desired effect. Jutoh’s Table Properties dialog works on the assumption that the minimum possible number of borders will be applied. The crucial setting is Collapse borders in the Table Properties dialog: if checked, the borders will be merged so you will only see one border for any given cell edge, not two adjacent borders. HTML-based formats and ODT all understand collapsed borders.
You can edit borders using the Table Properties dialog, which lets you specify borders for the whole table or a group of cells; or you can edit them for an individual cell via the Cell Properties dialog (click on Cell on the context menu).
Another issue that can be slightly confusing is that a table can have an overall border in addition to cell borders. This means that you have two ways of specifying the overall border: using cells, or the table box properties. However, only HTML-based formats know about the extra table border – not ODT or DOCX – so it’s best to use cell borders to form the table border. This is what the Table Properties dialog does.
You can specify a rounded corner for the overall table border, but even in HTML this won’t work if you use collapsed borders, and it probably won’t work in many ereaders.
If your table border doesn’t show up in the ebook, try increasing the width. On Apple Books, widths below 1pt are invisible.
Tables can be imported from DOCX, ODT and HTML/Epub. Most aspects will be retained, but these will not:
Shading and images in cell backgrounds (solid colours are supported);
vertical text;
double borders or border line styles other than solid, dotted, and dashed;
custom image borders;
banding in conditional table formatting where the bands are more than one row or column in size (DOCX);
horizontal and vertical inner borders in conditional table formatting (DOCX).
In summary, unless your table formatting is particularly fancy, import should be fine.
Tables should work well in most ereaders. Older Kindle ereaders supporting only KF7 (‘Kindle DX’ mode in the now-obsolete Kindle Previewer 2) will not show border styles other than solid, and all borders are either on or off – there is no choice of which cell borders are shown. Jutoh includes both KF7 and KF8 formatting for Kindle files, so most Kindles will show full table formatting.
Kindle for iOS is less capable when rendering tables than other KF8 Kindle apps and devices. Cell widths cannot be specified as percentages, and the table width attribute is not recognised. However, it does recognise the min-width attribute, so when generating Mobipocket files, Jutoh adds a min-width attribute to the table.
Adobe Digital Editions doesn’t handle absolute cell size very well, so cell size is converted to CSS minimum size properties unless a minimum size has been explicitly set. This should still work across all ereaders; but you can switch it off via the Use minimum size for cells configuration option.
Repeated table headers and footers are not supported by most readers, and Adobe Digital Editions does not rearrange the headers and footers from the standard HTML syntax (defined at the start of the table) to be at the actual top and bottom of the table. On the other hand, for Jutoh’s HTML output, Firefox and Internet Explorer printing does the right thing and places headers and footers on each page. Because of the lack of support for headers and footers in ereaders, they are switched off by default in all configurations. You can switch them on using the Table headers and footers configuration option.
Adobe Digital Editions has a unique problem when rendering large tables. In order to support centred tables in ADE, the CSS attribute ‘display:inline-block’ must be used. However, tables with this attribute do not span multiple pages – the part of the table that isn’t displayed on the first page will simply be lost. To work around this conundrum, set the configuration property Maximum table rows for inline-block to the number of rows above which you consider a table to be large and in danger of being rendered across page boundaries. The default is zero. Tables larger than this size will omit the ‘display:inline-block’ attribute to favour correct rendering across pages over centring. Centring should work correctly on most other ereaders without the need for this attribute, since we also use ‘margin-left:auto;margin-right:auto’ to implement centring.
Note that using inline-block can cause tables to be rendered incorrectly on some ereaders (with the overall table border becoming separated from the cells). Also, if you have the configuration option Maximum table rows for inline-block set to a non-zero value, the generated HTML table may have an extra paragraph tag around it in order to support centring on some platforms. Set the option to zero to ensure that a table that is alone in a paragraph is not enclosed within outer paragraph tags, which can cause problems in some situations, including unexpected text sizes. Use Maximum table rows for inline-block with extreme caution!
As noted above, ODT files, and DOCX files converted from ODT, do not support an extra, overall border so if word processor compatibility is required, you will need to form the table border using individual cell borders. The Table Properties dialog helps you do this, since the Borders page applies only cell borders.
As we’ve seen, inserting a table or using Format | Table | Apply Template lets you choose from a gallery of templates, using the Table Gallery dialog. Jutoh adds a standard set of templates by default; you can add your own or delete existing ones using the advanced menu options in the gallery dialog (click on the ‘...’ button).
The default table gallery is stored in a file in the standard application data area, but you can open and save gallery files in arbitrary locations if you wish. This could be useful for sharing templates with other users.
A template is defined as a series of formatting commands, each command dealing with a range of cells. You can’t add an existing table from your document to a gallery, but it’s not too hard to use the Table Template Editor dialog to define new templates, and it’s more flexible than a simple reproduction of an existing table. Having defined the formatting commands, the user will be able to customise them as regions in the gallery dialog, for example choosing a different colour for a “Header” region. For more information on creating templates, click on Help in the Table Template Editor dialog.
You should now have a good idea of how to create and edit tables. Next, we look at how you can use text boxes in your book.
Contents | Start | End | Previous: Chapter 13: Working With String Tables | Next: Chapter 15: Working With Boxes