
Contents | Start | End | Previous: Chapter 17: Adding Narration To Your Book | Next: Chapter 19: Adding Interactivity To Your Book
This chapter shows you how to create fixed layout books using the ‘Fixed Layout’ document type, and various configuration settings that are specific to this kind of book.
You can use the supplied sample, ‘Birds.jutoh’ (available via the Help | Browse Samples command) in conjunction with this chapter. The sample shows a book fixed in landscape orientation, with image and text objects laid onto an image background. The pages are edited as double-page spreads rather than left and right pages. Some of the graphics are pre-rendered onto the page background when compiling, to allow transparency. It compiles as an Apple Books fixed layout book, and as a Kindle KF8 fixed layout book with automatic magnification panels for text and images.
This is a book with a fixed number of pages whose content doesn’t reflow. It’s a format suited to magazines, children’s picture books, comics, ‘coffee-table’ books, amongst others. In contrast, most novels, biographies and other books with mostly text content should usually not be fixed layout books. Much of the content will be pre-rendered in bitmap images, but text should, if possible, be specified as actual text rendered by the ebook reader and not as images, to increase quality and reduce file size. In some cases, fixed layout books will be interactive via the provision of custom JavaScript code and dynamic content modification.
Reflowable books can easily match the different orientation of ebook readers with little or no effort on the book author’s part, but a few more choices must be made by the author in the case of fixed layout books. Here are some of the questions to be answered:
What will my page size be?
Should I create individual left and right pages, or single double-page spreads?
Will the user be able to change the device orientation to read in either portrait or landscape, or will the book be fixed to either portrait or landscape?
Can my separate left and right pages be joined together (‘synthesized’) to form a seamless double-page spread?
Some of these questions must be answered before work starts (for example, page size) but others can be changed in your configurations – with different settings in different configurations, to suit the target device or publishing platform. Jutoh will apply the current configuration settings with reference to the individual page settings, and compensate where necessary and possible.
Note that there is no fixed page size or aspect ratio that an ereader requires. If you have the luxury of targeting the aspect ratio (width and height) of a particular device, great, but displays come in so many shapes and sizes that you shouldn’t worry about it too much – choose the aspect ratio that suits your book, and the device will do the best it can.
Also, since pages are scaled by the device, the physical page size you choose isn’t critical. However, the larger the page size you work with, the greater the accuracy and the less chance there is for imprecise conversions (for example, conversion of font point sizes to pixels). You can still provide page background and other images that have more detail than the physical size shown in Jutoh. Extra resolution can be used for zooming, but also be aware of size and performance constraints when using large images.
You cannot generally mix fixed layout documents and reflowable book section documents: a project must contain one or the other, or the result will be unpredictable on most viewers. Some Epub 3 viewers do allow this, though, so if you know what viewer your users will be using, you can set the Allow reflowable and fixed layout configuration option to prevent relevant Jutoh warnings.
Typically, because fixed layout books tend to be more graphical than reflowable books, you will need other tools in addition to Jutoh; at minimum, a simple bitmap editing tool for resizing, cropping and so on.
You can import from Epub 3, containing a single image per book or text boxes and images (certain complex Epub 3 files might not import successfully). You can also import from a CBZ comic file, which is a zip archive of image files, one file per page. If you have separate images for import, make a zip file of them and rename the file extension to .cbz. You can use the New Project Wizard, or the File | Quick Convert command, or the File | Open command, to import an Epub or CBZ file.
Or, if your existing book was designed using an application such as Adobe Illustrator, you may not be able to import it into Jutoh directly, but you can export a page as a bitmap and paste that into Jutoh one page at a time (or make a CBZ archive).
Or, import the content into a Jutoh project as a reflowable project, and copy and paste text and images into pages in the fixed layout project.
It’s worth emphasizing some of the issues you might find with fixed layout, which might influence you in your choice between reflowable and fixed layout.
Text may not appear exactly as shown in Jutoh. Even when font sizes are expressed in pixels, HTML-based systems simply render text differently and according to their own rules. So, especially if you have a lot of relatively small text, it may take less or more space than expected, leaving extra white space or causing overlapping. You can mitigate this to some extent by embedding fonts and choosing a suitable Font pixel scale value in your configuration. When using small amounts of large text, this will not be such an issue, and of course you can pre-render text into the book images if the text is sufficiently large not to have significant quality problems.
Text cannot reflow between pages or boxes. All text will be restricted to its own box, so certain kinds of book may be difficult to implement.
It’s harder work to create a fixed layout book, not only because each page requires precision, but because there are several different fixed layout standards, and you have to make sure that your book is optimized for each one – this can usually be accomplished via Jutoh configuration settings, but it’s definitely more time-consuming to keep all requirements in mind, and test on different devices.
How good a fixed layout book looks on a particular device is much more variable than for a reflowable book, given the different device sizes, aspect ratios and resolutions. With a reflowable book, the user can crank up the text size or change the font, but with fixed layout, parts of pages must be zoomed on small devices, and for some devices there isn’t an automatic zoom facility anyway. Some ereaders can zoom images in reflowable books to full-screen – an advantage that may be lost with fixed layout books.
You are restricting your audience, since not all devices can cope with fixed layout. However, this may not be a problem if you’re targeting a particular device or class of devices. Note that Barnes & Nobles Nook fixed layout format is not supported by Jutoh and in fact is a proprietary format that cannot be used without a non-disclosure agreement with Barnes & Noble. This will probably be replaced by Epub 3 soon, but meanwhile, if you wish to allow Nook users to read your books, you will need to make a reflowable version for them. Kobo uses the Apple Books format, but not all ebook redistributors will allow you to upload fixed layout Epubs. Check first!
Using specific fonts isn’t so important in a reflowable book, but in a fixed layout book, you are likely to want to embed specific fonts, both for aesthetic reasons and also to preserve the layout as much as possible. Since embedding fonts in an ebook requires legal rights to do so, this may require a rethink about what fonts you can use compared with an existing print book.
Fixed layout books may have a large file size, especially if you pre-render text in large background images. If you have a lot of pages, you may hit file size restrictions sooner than for a reflowable book.
Fixed layout books cannot be imported from ODT or DOCX, but they can be imported from simple fixed-page Epub 3, and from the CBZ comic format. They can be exported to ODT, but with some restrictions: please see the help topic Creating fixed layout books in the Jutoh application help for details.
Consider whether you really need fixed layout; will it benefit the readers? For example, a guide book may look snazzy in fixed layout format, but a tourist trying to zoom in on areas of text on a phone or small tablet may get frustrated.
These features are supported:
Apple Books Epub output (also used by Kobo);
Kindle KF8 output;
Epub 3 output;
ODT output;
CBZ comic output;
text and image objects, positioned using absolute coordinates;
automatic generation of magnification panels in KF8 for text objects, image objects, and background images;
the option of pre-rendering text and images to support transparency and other requirements.
These features are not supported:
HTML templates;
the ability to show magnified objects that are different from the source objects (for example, showing a hidden object in response to touching an area in the page);
percentage units for Kindle;
relative positioning of images and boxes.
When you run the New Project Wizard in Jutoh 2, you will see a Layout Choice page, offering a choice between a regular reflowable book, and a fixed layout book:
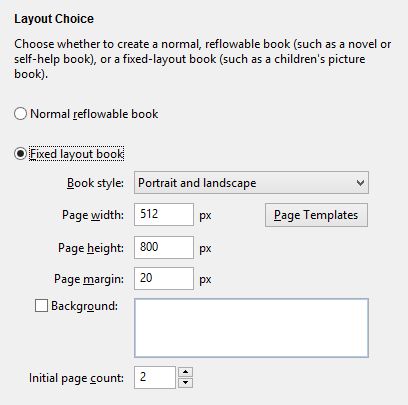
The layout choice page of the new project wizard
If you choose Fixed layout book, Jutoh will create some empty pages for the new book if you don’t later choose to import from an existing file. Select the kind of layout you will be using from the Book style dropdown, as follows:
Portrait and landscape: your book will be viewable in both orientations, showing a single page portrait mode, and showing two pages at a time in landscape mode.
Portrait only: only the portrait orientation will be allowed.
Landscape only, two pages per spread: only landscape orientation will be allowed, but each Jutoh document will be half of the final landscape page.
Landscape only, double-page spread: only landscape orientation will be allowed, and each Jutoh document will show as the full landscape page.
For books that have independent left and right pages, the first option is recommended. The choice you make here can be changed later in the Options page of the Project Properties dialog. The main effect of the book style choice is to allow Jutoh to do two things: firstly, to set the Orientation lock configuration property whenever a configuration is created; and secondly, to initialize the page type for each Jutoh fixed layout document. The page type will be used to determine whether the page is on the left or right, amongst other things, as we shall see later.
The page size can be any size you want, but you may wish to choose a size that’s targeted at a particular device’s aspect ratio. Devices with different aspect ratios will still show the book, but with more unused display. Most devices will scale the book to the largest size that fits the display so the absolute size is not as crucial as the aspect ratio. In most cases you will probably choose Portrait and landscape. Click on Page Templates to choose from some predefined sizes; you can also add your own for use later. Specify a margin if you are going to add text and image objects to your pages and you want to have them snap to within a margin. You can also choose a background image to be used for new pages. You can change these settings later per-project, and per-page.
Finally, choose how many pages to create initially. You can add more later.
Click Next to move to the Import wizard page. You can opt to create a blank project, or to import from an Epub 3 fixed layout file or from a CBZ comic file containing page images.
Click Next to move to the Cover wizard page, then Finish to create the project.
When you first click on a page in the project, you will see a blank page. The first thing is to assign the image you want to show as the background to the whole page. It can be a higher resolution than the page size – in this case, it will allow scaling and zooming without so much loss of detail.
The following picture illustrates a typical session:
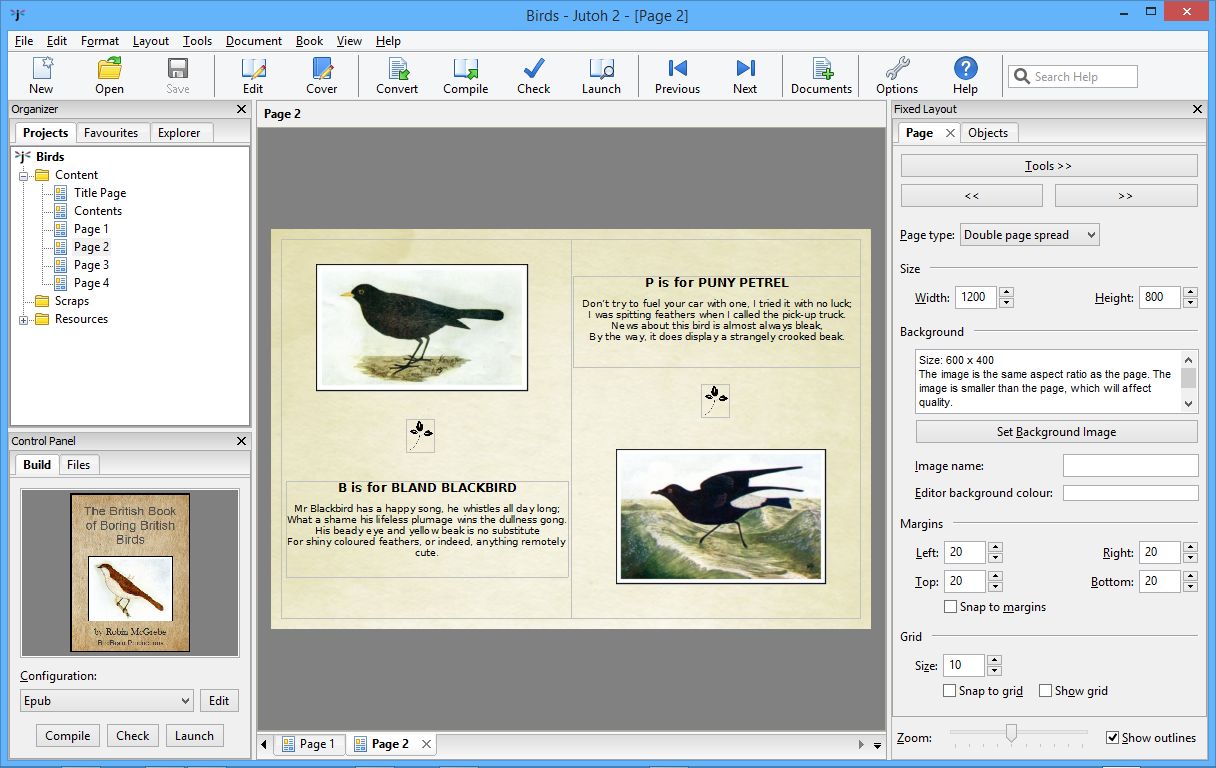
Editing a fixed layout page
When you are editing a page, the Fixed Layout palette appears on the right, with two tabs: Page and Objects. The Page tab contains controls for editing the page type, size and background image, among other things. The Objects tab contains a list of additional images and text objects that should be shown on top of the background image. You can add and delete these, and set their properties, such as size and colour. Under both tabs, there are controls for zooming and showing object outlines.
The Page type control indicates what kind of page this is. The type is used mainly for Kindle books that outputs a type per page file. The possible values for this control are:
(unspecified): Jutoh will guess the page type.
Single left page: this is a left-hand page that can stand on its own in portrait mode.
Single right page: this is a right-hand page that can stand on its own in portrait mode.
Spread left page: this is a left-hand page that is part of a double page spread.
Spread right page: this is a right-hand page that is part of a double page spread.
Double page spread: this denotes the whole of a double page spread, or a single wide page that should span the whole screen.
Blank: this is a blank page, used as a place-holder, for example at the end of a book with an uneven number of pages. Currently this type is not used by Jutoh.
The page width and height can be edited, but it’s recommended you use the same size for all pages.
The Tools menu gives you access to various useful commands such as alignment, copy and paste, and more. The same menu is shown when you right-click over the page background. Use the << and >> buttons to quickly navigate between fixed layout pages.
Set the background image with the Set Background Image button. The resolution and file name will be described, along with a hint about whether the image and page sizes match and whether the aspect ratio is appropriate for the page size. As we mentioned, do set a higher-resolution image than the page dimensions, to increase quality. The background image will also be scaled to fit the page size.
You can set margins for the page if you wish, and check Snap to margins if you want objects to be constrained within the margins when positioning them.
You can also set the notional grid size and check Snap to grid to make object positioning easier.
With some books, you can simply provide a single image per page; but ebook distributors generally recommend that as much content as possible is provided as actual text layered on top of the page image. Also, if you add image objects that float above the page image, Jutoh can provide zooming. For example, in a photography book, the reader can double-tap on an image on the page to view it in more detail.
To add an object, click on Objects and then New Text or New Image. You will be prompted for a name for the object; this allows you to keep track of them in the object list, where you can move them up and down in order to specify their positions in the z-order (how they are layered).
Double-click to edit inside a text object. When you are editing text, the Formatting Palette will be displayed (you may need to press Alt+P if the palette is not displayed). It will be hidden automatically when you are not editing text. Text objects can contain most of what a regular, reflowable Jutoh page can contain, including images but currently excluding currently footnotes.
You can give a text or image object borders, a background colour, margins and more by clicking on Properties next to the object list (or by using the Properties command on the context menu, or by alt-left-clicking on the object). Reposition the box by dragging it or editing its properties, and resize it by dragging the bottom-right corner or (again) editing its properties. You can also set the position and size directly using the controls in the Objects tab.
If you have light-coloured text, you can change the editing background colour to a more suitable one with the Editor bg control in the Page tab. This can be changed per page.
You can paste text and image objects from text and bitmaps on the clipboard by using the Paste command or Ctrl+V. When an image is pasted (or inserted from a file), the box that surrounds the image is scaled proportionately to how much ‘extra’ resolution there is in the background image compared with the actual page size. This means that if you are working with a background image at a certain resolution, and cutting out images to paste onto your page, they will appear at the correct relative size.
You can paste background images from the clipboard using Paste Background Image from the context/tool menu. The original resolution will be retained, and the image will be scaled to fit the page. Images pasted from the clipboard are always saved in PNG format internally, and not JPEG, so that they don’t lose any detail.
You can paste the background image to the clipboard for editing and re-pasting back to the page, using Copy Background Image. Similarly, you can paste image objects to the clipboard using Copy.
The ‘focused’ object has a dotted outline. There can only be one focused object, which will receive keyboard input such as Return to edit its properties, but there can be multiple selected objects, for example by dragging a rectangle around several shapes, or by control-clicking on several objects. Selected objects have a dotted outline, but also have a checkbox in the top-left corner.
You can manipulate objects via the keyboard by first clicking on the canvas background to give it the keyboard focus, and then using:
Tab to cycle forwards through the objects;
Shift+Tab to cycle backwards through the objects;
Shift+Return to edit the object’s properties;
Return to start editing a text object;
Delete to delete the selected shape(s) or focused shape.
Left, right, up and down arrows to move the shape by a pixel, or 10 pixels if you hold down the shift key.
A book often looks best when there is a good margin around the content. You can set the left, top, right and bottom margin sizes in pixels using controls on the Page tab. If you also check Snap to margins, when you move objects they will be limited to the area inside the margins.
You can align objects relative to the page or other objects. For example to align object B with respect to object A, click first A, then B, right-click (or control-click on the Mac), or click on the Tools button, and choose Align | Left. The first-clicked object will be the reference object, with respect to which the other selections will be aligned.

The Tools/context menu
If you only select a single object, it will be aligned with respect to the page if possible (applicable horizontal or vertical alignment). These are the available alignment commands:
Left: align the left side of an object with the left side of the reference object;
Right: align the right side of an object with the right side of the reference object;
Centre Horizontally: horizontally align the centre of an object with the centre of the reference object, or the centre of the page;
Same Width: give an object the same width as the reference object;
Top: align the top of an object with the top of the reference object;
Bottom: align the bottom of an object with the bottom of the reference object;
Centre Vertically: vertically align the centre of an object with the centre of the reference object;
Same Height: give an object the same height as the reference object;
Same Size: give an object the same size as the reference object.
In addition to snapping to margins, you can snap positions to a notional grid (Snap to grid) whose granularity you can control with the Size field. You can also check Show grid to show the gridlines.
You can add borders when editing the properties of each object. These borders will be created using HTML and CSS; if you wish to add a border permanently to an image, you can right-click on an image and choose Add Border. A dialog will be shown for you to choose an outer border and an optional inner border. You also have the option to add a larger border to take into account the scaling of the image, if the image resolution is greater than the size of the object on the page.
Pre-rendering can be done for none, all, or some text and image objects in your project. Pre-rendered objects will be drawn onto the background image and will no longer have their own independent existence in the ebook. Pre-rendered objects cannot be magnified on Kindle. You can override per-object settings with the Pre-render objects configuration option, for example if one ebook platform requires background-image-only pages and another platform benefits from independent objects.
Here are some reasons why you might wish to check Pre-render this object in your object region properties:
An image has transparency, which is not supported by most ereaders. Pre-rendering the object will allow transparency to work, and is appropriate for decorative images.
An image does not need to be magnified, and merging it with the background may reduce file size, especially if the original image was provided at a high resolution.
An image overlaps the edge of the page, and it needs to be clipped by merging with the background image.
A text object needs to be rendered precisely in advance, and it’s hard to predict final text layout when using actual text.
The book must be delivered with text in special fonts, but those fonts cannot be embedded in the file for copyright or other reasons.
The quality of rendering depends on the resolution of the background image and (if it’s an image object) the object’s original image resolution. For example, if the background image resolution is much greater than the page size, text will be rendered at a relatively high quality because it will be scaled up and drawn onto a large background image.
Note that images are currently not pre-rendered with any specified borders or margins; text objects are rendered without full justification and are subject to the visual restrictions of the editor, so any CSS customisation won’t show. Any hyperlinks will not work. Also, if there is no background image, no pre-rendering is done and pre-rendered objects will not show on the page at all.
Currently, position and size of pages and objects should be expressed in pixels. (To clarify, dimensions within text boxes can have different units, such as percentage image widths, but the actual top-level object position and size must be in pixels.) You can use the configuration options Font size units and Dimension units to specify whether the font sizes and dimensions should be written to HTML as points, pixels, cm or em. The Apple Books and Amazon Kindle author’s guides recommend using pixels. As well as getting Jutoh to convert the font sizes to pixels via Font size units, you can also specify font sizes in pixels in styles and direct formatting.
Conversion to pixels requires a value for dots per inch; by default the current display DPI is used, since this corresponds best with what’s displayed on your screen. However, for consistency between platforms, you can also specify the DPI value to use in the Options page of Project Properties, with Use custom DPI for conversions. If using pixel fonts (and specifying pixels in Font size units), you can use the Font pixel scale configuration option to adjust the text size shown in Jutoh to a value closer to that used in the ebook. Different ebook renderers will render fonts in slightly different ways, so this value may need to be adjusted separately for different configurations. A scale value of 0.85 often works well for Epub and Kindle.
It’s highly likely that if you include text boxes in your project, you will want to embed a font in order to maintain the look of your project. Embedding fonts is covered in the Advanced Topics chapter, but as a quick reminder:
Check the configuration options: Embed fonts, Generate font names, Generate generic font names.
Add embedded font documents to your project. If there are several font files per family (for example, for italic and bold variants), make sure the font name in each font document is the same, and adjust the style and weight settings to suitable values. The ereader will use this information to render the correct font according to the text formatting. Use Format | Insert | Embedded Fonts to show a wizard that will make it easy to add several fonts at a time.
If you can add the fonts to your system, do so, and make sure the font name in your font documents match those in the document. If for some reason they don’t match, use the Font substitutions configuration option to map the font names in your project to the names used in your embedded fonts.
Embedded fonts are supported by all systems that support fixed layout books, notably Apple Books, KF8 and Epub 3.
If you don’t wish to embed fonts, consider pre-rendering text objects (see the above topic).
If you have a table of contents, it will need to be created as a fixed layout document, with one or more text boxes manually linked to the other pages in the usual way. Don’t forget to assign the table of contents page the ‘toc’ guide type, in the document properties. Unfortunately automatic table of contents creation doesn’t work for fixed layout books, but you can customise the NavMap by adding entries in Project Properties/Indexes/Contents.
A text box containing hyperlinks must have its region properties set so that it doesn’t show any magnified panel on Kindle. Otherwise, nested links are generated and the ereader may crash.
If you set Cover design to your cover design (usually ‘Default Cover’) and enable the configuration option Generate cover page, Jutoh will generate a cover HTML page. Alternatively, you can disable Generate cover page and create your own cover page as the first page in the project. Set the guide type in the document properties to ‘cover’.
Unlike most Epub 3 readers, Apple Books does not always show the generated HTML cover page correctly, so you may well prefer to disable Generate cover page as above. But you should continue to specify the Cover design to provide the portrait-orientation thumbnail cover image.
As mentioned later, specifying a cover can cause duplicate covers to appear on Kindle: this is a Kindle rather than a Jutoh issue.
As usual, you now just need to choose a suitable configuration (Epub, Mobipocket or CBZ) and press Compile to create your Apple Books Epub, Amazon Kindle or CBZ comic book. You can test Kindle books with Kindle for PC or Kindle Previewer 3, and of course on devices.
Adobe Digital Editions 4 handles fixed-layout Epub 3 ebooks, but not always very well. On Windows, it uses Internet Explorer to do this, with uneven results. You can also try the AZARDI viewer, or Readium for iOS and Android. You can also preview a fixed layout page in a web browser with Book | Preview Section (Alt+/).
While the ‘book style’ that you chose in the New Project Wizard or changed in Project Properties is a rough indicator of the layout of your book, it is only used as a hint when creating new pages or new configurations. When Jutoh generates a book, it actually looks at the configuration settings to determine how it will create the necessary HTML and other files.
The relevant settings are listed below. Remember, you can search for settings using the search box at the bottom of the configuration page (click on the box, or use Ctrl+F, and start typing).
Enable fixed layout: this should always be enabled for fixed layout books.
Allow reflowable and fixed layout: check this if your book contains reflowable and fixed layout content. The mainstream platforms (Apple Books, Kobo, Kindle) don’t allow mixing types of content, but Epub 3 allows it.
Orientation lock: whether the book will be locked in portrait or landscape mode. This doesn’t refer to the actual aspect ratio of an individual page: this is entirely up to you.
Pages per spread: how many pages (HTML files) will be created per double-page spread. This may differ from the way you created your pages – Jutoh will split or merge pages accordingly.
Synthesize spreads: whether left and right pages should be ‘stuck together’ to form a seamless spread, or whether the pages should be shown as being separate (even if next to each other). If not ‘Default’, this setting overrides individual page settings.
Page width: the overall width of the book. This may be different from your individual page sizes if the Pages per spread setting indicates that Jutoh should split or merge pages.
Page height: the overall height of the book. Currently Jutoh doesn’t split or merge pages in the vertical direction so this should always be the same as your page heights.
Book type: this is only used for Kindle and need not be set; if you select ‘comic’, it enables automatic zooming facilities on some Kindles and changes the rendering of double-page spreads. There may be rendering side-effects when specifying a book type, so test the book carefully. Please see the notes below regarding setting KF8 options.
Open to spread: if checked, the book will open directly to a full-page spread. This is only applicable to Apple Books.
Show binding: if enabled, a binding crease will be shown in the middle of a double-page spread, in Apple Books only.
Write page image as background: if checked, the page background will be written using the background-image CSS property, which for KF8 will disable default zooming but will also prevent the background from being shown independently from the rest of the content when clicking/double-tapping on the background.
Pre-render objects: if set to ‘Default’, any text or image objects that have Pre-render this object checked in their region properties (or inherited page or project properties) will be rendered to the background image instead of being written to the ebook as a separate object. If this option is ‘Always’, all objects will be pre-rendered, and if ‘Never’, no objects are pre-rendered.
Font pixel scale: this option is in the HTML Formatting group rather than Fixed Layout, but it is useful for making the text size in ebooks closer to the size as shown in Jutoh. Try a value of 0.85 if the ebook text is too large. It is only used when font sizes are expressed in pixels. If your font sizes are in points, you can scale the text size in ebooks by setting the Custom DPI in Project Preferences/Options.
Auto region magnification: for KF8 output only, this option enables Jutoh’s automatic generation of magnification regions for backgrounds, text objects and image objects. For more on this, see below. You may wish to switch this off if targeting e-ink Kindle devices since it can cause interruption of normal page navigation.
Kindle fixed layout books have specific rules relating pages-per-spread and orientation: if you fix your orientation to ‘Landscape’, then Pages per spread must be ‘One’. If you’ve created each left and page individually, then this may seem to be a problem, but Jutoh will merge the left and right pages if your configuration settings are consistent with each other, and will warn you if they aren’t. The only wrinkle is that you don’t have the option to show the pages separately: they will be immediately adjacent to each other. However, if you want there to be a gap, just choose ‘(none)’ for Orientation lock and then the individual page types will indicate whether the pages are synthesized (joined) or not.
It is possible to have a Kindle book presented in single pages when in portrait orientation, and presented in paired, double-page-spread format when rotated to landscape orientation. To achieve this, set Orientation lock to ‘(none)’, specify two pages per spread, and set Synthesize spreads to ‘Landscape’.
You can have different settings for different configurations; so you can make Jutoh split or merge pages when using one configuration, and do something different for another configuration. You can also add new configurations for the same format, for example to create several styles of Kindle layout. If you do this, don’t forget to change the Book file name setting for each configuration or files for different configurations will overwrite each other.
You may find that Kindlegen complains about the image file size, if you have very large images. This can be a problem if your image files are larger than the viewport, and especially if Jutoh is stitching two images together to make a spread. You can get Jutoh to resize the images when generating the book, by specifying Maximum image width/height in your configuration. You can choose a size that eliminates the error message. This currently only works if not splitting or merging pages. Also be aware of the 650MB overall file size imposed on Amazon KDP uploads.
You can specify a cover image with the same aspect ratio as your page size, but for the HTML cover page, it may be better to switch off Generate cover page in your configuration and make your own cover page, setting the guide type to “cover” via the document’s properties.
The Kindle publishing guidelines recommend adding an HTML cover page (whether automatically via Jutoh or explicitly), but at present it will result in two covers being shown - the image, and the page. So you may decide to switch off HTML cover page generation to avoid that.
Note that there are some problems when displaying fixed layout books on the Kindle Paperwhite (and possibly other e-ink Kindle devices):
Image objects may be displayed at the wrong size if using magnified regions. Workarounds include switching off region magnification via the configuration option Auto region magnification (or per-object), or pre-rendering the images to the background.
Images within text objects may not centre correctly. To work around this, you can insert the image into a centred 1 row by 1 column table.
KF8 supports a technique called ‘panel magnification’ for zooming into parts of a page. Jutoh can generate magnified panels for text objects and image objects if you check the Auto region magnification configuration option. When you touch a text object, it will be shown in a larger box at 150% magnification; similarly, an image object will be shown at 200% (by default). You can edit visual characteristics such as the magnified panel’s border width and colour, and zoom factor, using the Region tab of the object properties dialog. Or, you can edit these characteristics for a whole page using the Regions tab of the document properties dialog, or for the whole project if you use the Regions tab of the Project Properties dialog. You can make page or object properties override the higher-level properties.
To make an image show full-screen, give it a large zoom factor such as 500%, and it will be limited to the available space.
If you are not seeing any magnification for a large image, it’s probably because the image is constrained by the display size.
If a page has no separate image or text objects, Jutoh will generate five magnification regions for the background image: top-left, top-right, bottom-left, bottom-right, and centre. The whole page will be zoomed when one of these regions is touched.
Note that Kindle Previewer 2 does not always display magnified regions properly; sometimes it will give up altogether after a few zooms, until Previewer is restarted.
On the Kindle Paperwhite, double-tapping an object starts magnification, and single-tapping cycles through all the magnified regions until you double-tap again.
IMPORTANT: if you enable Auto region magnification, links within text objects that are subject to magnification won’t work. So treat this option with caution.
Unless you are forcing landscape mode:
Set Book type in your configuration to ‘comic’. This way, double pages will work in landscape mode on LCD Kindles, and on e-ink Kindles the book will be fixed to portrait with no option for landscape (which can be illegible in landscape anyway due to the low resolution). When book type is set to ‘none’, the Kindle Keyboard renders fixed layout books terribly – they are fixed to landscape (rotated), but only one page is shown at a time!
Also clear the Auto region magnification configuration option or the Kindle Keyboard will cycle through the regions when paging.
Note that these recommendations are for the current state of Kindle apps and Kindle Keyboard hardware as of May 2013; changes from Amazon may render the advice obsolete. Behaviour of fixed layout books with different combinations of settings can be a little unpredictable from one device to the next, as you can see from one author’s tabulation of the permutations. Do test your book on as many devices as possible.
Apple Books Epub files need two pages per spread, and unlike Kindle, can never be a single page (or file) per double-page spread. So you need to set Pages per spread to ‘Two’ if your actual Jutoh project contains double-page spreads implemented in a single page, forcing Jutoh to split the pages.
Apple specifies that there should always be a cover, which appears on the right-hand of the first spread, meaning that left pages are even-numbered and right pages are odd-numbered. You can use the cover generated by Jutoh, which will be optimized for absolute layout and the configuration page size, or you can switch automatic cover generation off (set Cover design to ‘(none)’ and clear Generate cover page) and add it as the first page of your project. In this case, don’t forget to set the ‘toc’ guide type in the document’s properties, and also set the page type to ‘Single right page’.
Even if your double-page spreads make sense when read as individual pages, Apple Books does not currently support viewing single pages in portrait orientation: the whole spread is shown.
If you don’t like the default simulated crease down the middle of the double-page spread, you can switch this off by clearing the Show binder configuration option.
Note that when sideloading a fixed layout Epub onto a Kobo eInk device such as the Kobo Aura H2O, the extension of the file needs to be .fxl.kepub.epub to trigger the Kobo WebKit, or the formatting will not work. You can have Jutoh do this by setting the configuration option Book file name to %FILENAME%.fxl.kepub.epub.
A CBZ file is a zip archive containing images, one image per page. CBZ files can be viewed by a wide variety of mobile and desktop readers. When Jutoh outputs to a CBZ file, it renders each page into a PNG image. You can still use individual text and image objects, and they will be merged into the page image. As with the other formats, you can specify whether a double-page spread should be split into single pages, or whether single pages should be merged into double-page spreads.
If you are using reflowable book section documents, and have a single image per page, you can make this into a fixed layout book without using fixed layout page documents. Enable the Fixed layout configuration option, and also set the pixel size of your images in Page width and Page height. Switch off Generate table of contents in your configuration to prevent a reflowable page being included, and set Epub version to 3.
Jutoh will now mark the book as fixed layout, and the single image per page will be used to fill the page.
This can be especially convenient if you wish to import from a document containing a lot of images, or a set of HTML files.
This technique may not work on Apple Books.
You may wish to take advantage of the wider distribution of reflowable books compared with fixed layout. Some aggregators (redistributors) may not accept fixed layout books; and Amazon may refuse to serve fixed layout books to Kindle for iPad (for unknown reasons since iPad for iOS is perfectly capable of displaying them).
To fake a fixed layout book using only reflowable layout, for each book section document insert a single image containing an image of the page at a high resolution (around 2000 pixels wide). Apply the Centre paragraph style to centre the image, and set the image width to 100% (click on the image to show its properties, then on the Size tab, set the width value to 100 and the units to percent).
You can specify that only landscape orientation will be used by setting Orientation lock to Landscape. Your reader will then be forced to turn the device into the landscape position.
Note that in this method, we output a reflowable book. In the previous topic, we use a regular reflowable document but output the book as fixed layout. The ebook readers will use different rendering mechanisms but the end result will be similar.
An advantage of this approach compared with the previous one is that you can still include linked tables of contents and other linked content as text pages.
When reading a book prepared in this way, the user may need to adjust the settings to show one page at a time. On Kindle for iOS, tap on the Aa button and click on the single-page icon at the bottom of the menu.
These resources may be useful in conjunction with this guide:
Kindle Publishing Guidelines:
http://kindlegen.s3.amazonaws.com/AmazonKindlePublishingGuidelines.pdf
Kindle fixed layout templates:
https://kdp.amazon.com/community/thread.jspa?threadID=9978&start=255&tstart=0
Tutorials on both Kindle and Apple Books fixed layout:
http://authoradventures.blogspot.co.uk/p/tutorials
MobileRead.com page on fixed layout Epub:
http://wiki.mobileread.com/wiki/Fixed_layout_ePub
This chapter has described the details of creating fixed layout pages in Jutoh as well as the pros and cons of fixed versus reflowable layout. In the next chapter, we see how simple interaction can be added via Jutoh, if you have (or have access to) JavaScript skills.
Contents | Start | End | Previous: Chapter 17: Adding Narration To Your Book | Next: Chapter 19: Adding Interactivity To Your Book