
Contents | Start | End | Previous: Chapter 23: Conditional Formatting | Next: Chapter 25: Troubleshooting Your Book
This chapter describes a variety of advanced topics that the newcomer to Jutoh can most likely ignore.
Jutoh lets you embed fonts into Epub books. You might wish to do this to ensure that non-Western characters are rendered correctly, especially for viewing in Adobe Digital Editions, which fails to render non-European languages without embedding; or you may just wish to give your ebook a different look. However embedded fonts are not supported by all ebook readers, and there may be copyright issues; so you should only embed fonts if absolutely necessary.
An example of a Unicode font that you can freely embed in your ebook is DejaVu, available from:
dejavu-fonts.org/wiki/Main_Page
If you wish to create a Greek Epub, you can use the free Gentium font, available from:
scripts.sil.org/cms/scripts/page.php?site_id=nrsi&id=gentium
To embed a font, follow these three steps.
Add a font. Use the Documents toolbar button or Document | Add Embedded Font Document menu command. Select a font file when prompted. A copy of this font will be added to the project and you can change the font family name and other parameters. Change the font family name to match the font name used in your ebook styles, if applicable.
Enable embedding in your configuration. In your Epub configuration(s), available from the Configurations tab on the Project Properties dialog, scroll down to the Fonts group and check Embed fonts if not already checked. Note that if Embed fonts is enabled, as well as Optimize for iBooks, Jutoh will generate a file called com.apple.ibooks.display-options.xml with specified-fonts set to true. This enables font embedding for Apple Books.
Specify font substitutions. If the font is installed on the computer and is therefore available from Jutoh’s dialogs, and is specified in your book, then you’re done. But if the font you want to use is not specified in your document, you must specify a font substitution in the Font substitutions property in your configuration. For example, ‘Times New Roman: DejaVu Sans, Times New Roman’. This will use DejaVu Sans, Times New Roman for the font family wherever Times New Roman is found in style definitions and content. The ebook reader will fall back on Times New Roman if it can’t find the embedded font DejaVu Sans. You can specify multiple font substitutions by separating them with semicolons.
Or, as a convenience, you can use Format | Insert | Embedded Fonts which will take you through a wizard for the above steps, allowing you to select multiple fonts that may belong to the same family.
If you have multiple font files for a single font family, for example regular, bold and bold italic variants, you can use the same font family name in all of these font documents (for example, DejaVu Serif) and specify the italic style and weight properties in each font document, as in the following:
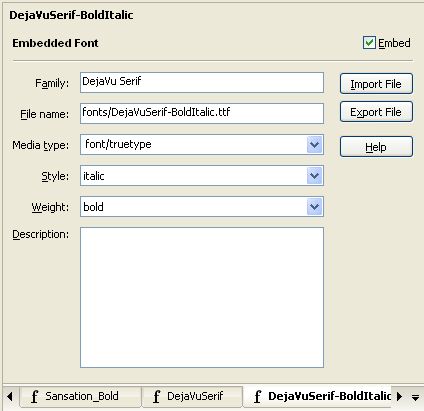
Font document
Jutoh will generate the appropriate CSS so that the viewer can use the correct font file for each combination of italic style and weight.
If font embedding isn’t working at first, check that the font family specified in the font document is identical to the font name you use within styles, or within your font substitutions. Otherwise the ereader will not be able to find the correct font to use.
Even if you have the option Generate font names switched off, embedded fonts will still be named explicitly in generated styles. This allows the book to use default fonts except where they are embedded, to allow the ereader user to still configure the fonts for the majority of the book (where fonts are not named).
Jutoh lets you embed audio and video into Epub and Mobipocket books. This is only supported in some readers (for example, Apple Books), and Amazon may not accept Mobipocket containing multimedia (and media in locally-transferred Mobipocket files may be blocked).
For video in Apple Books, Apple recommends that you use H.264 compression at VGA resolution. The poster image should be 150x300 pixels. Audio should be stereo, AAC/MP4, 256kps, encoded using iTunes.
Amazon’s guidelines for formatting Kindle books, with information about audio and video formats, is available at:
kindlegen.s3.amazonaws.com/AmazonKindlePublishingGuidelines.pdf
To embed a media object, follow these three steps.
Add a media document. Use the Documents toolbar button or Document | Add Media Document menu command. Select a media file when prompted. A copy of this file will be added to the project (it may take a long time if the file is large) and you can change the file name to be used and other parameters.
Insert a media object into your content. Use the Insert | Media Object command on the Format menu or the context menu, and when prompted, choose the file name from the list of media objects currently in this project. Enter other parameters if you wish, such as a title, and fallback text to show if the reader does not support the audio or video tags.
Ensure media objects are switched on in your configuration. Under the Images and Media group in your configuration, check that Generate media objects is enabled. If you switch this off, no media files will be included in the book and the media tags will not be included in the XHTML.
You can also use media documents and objects to insert images. The image won’t show up in the editor when you insert a media object that references the media document, but there is an advantage – you could add several media documents with the same name, at different resolutions, and use configurations to selectively include and omit media documents from the generated ebook. You do this by specifying tags in your media document, (for example, ‘hires’, ‘lores’) and then specifying tags in the configuration options Include media documents matching tags and Exclude media documents matching tags. This technique is also useful for very large images that take a long time to load into the editor when inserted directly.
Currently embedding a PDF into your book works in Apple Books only.
Add the PDF and PNG files to the project as media objects (Document | Add Media Document).
Add this to your content, in its own paragraph:<p><a href="media/subwaymap.pdf"><img src="media/map.png" alt="img"/></a></p>substituting your own file names.
Apply the ‘HTML’ style to the above paragraph.
EpubCheck will complain about the syntax, which you can ignore.
The following method works for some Epub viewers, including Adobe Digital Editions.
Insert a new image into the Resources section of your Jutoh project using Document | Add Media Document and selecting an image.
Ensure that Generate media objects is enabled in your configuration.
Right-click on the section(s) you want to have a background image, select Properties, and insert the following into the Extra CSS field:body {where
background-image: url(media/image.png);
background-repeat: repeat;
margin: 0 0 0 0;
}media/image.png is the path specified in the media object. Alternatively, if you want it on all pages, you could add this once to the style sheet (click on the Edit button at the top of the Styles page in Project Properties, check Custom CSS and paste the code).
When importing text files, Jutoh needs to know what the encoding of your files is, since otherwise the files are just streams of bits that could represent anything. A ‘standard’ ASCII file only represent the basic symbols, whereas files encoded in Unicode can represent most symbols in use on the planet. Jutoh’s favoured Unicode encoding is UTF-8, in which plain text is encoded with one character per symbol (and so is readable in any text editor) and more complex symbols are represented by two or more characters.
When you save text from a word processor, you need to make sure it’s going to write using the encoding that you’ve specified in the New Project Wizard or Project Properties. For example, when saving a document as plain text from Microsoft Word, Word will show you a further dialog. Click on Other encoding and select ‘Unicode (UTF-8)’. Don’t check Insert line breaks, since you want each paragraph to be one line.
If you forget to save in the right encoding, you may be able to fix it, as follows. When you get an Jutoh error indicating an encoding problem (or the file doesn’t show properly in the finished book or the editor), open the file in an encoding-savvy application such as Programmer’s Notepad. It should auto-detect the encoding, which you can check by typing Alt+Enter to see the document’s properties. Now select the whole document and copy it to the clipboard. Create a new file, change the encoding to UTF-8 in the document’s properties, and paste the text into it. Save this over the original file – it’s now in the correct encoding.
If you can’t change the encoding of the original file, you can specify it in the Import Options section of the New Project Wizard, or the Options page of Project Properties if you’re importing a file after initial project creation. Also, if you are importing HTML or Epub and the encoding is missing from one or more HTML files, Jutoh will use this setting – it will also warn you about the missing encoding so you can go back and specify it. For example, if the file was created on Windows without specifying UTF-8, you could try the value ‘Windows Western European’.
Each document in a book can have a ‘guide type’ which is written to the guide section of the Epub or Mobipocket file, and indicates the role of the document. You can set the guide type by right-clicking on the document in the outline, selecting Properties to show the Document Properties dialog, and then changing the Guide type selection.
These are the possible guide types:
acknowledgements
bibliography
colophon
copyright-page
cover
dedication
epigraph
epilogue
foreword
glossary
index
loi – list of illustrations
lot – list of tables
notes
other.back-cover
other.intro
other.ms-firstpage – the place to start reading. Kindle only, deprecated in favour of ‘text’.
other.reader-start-page – the place to start reading. Apple Books only.
preface
start – the place to start reading. Kindle only, deprecated in favour of ‘text’.
text – the first chapter of main body of text; it should not be used more than once
title-page
toc – table of contents
When Jutoh generates a section without it being present in the project outline (for example, the cover page and simple table of contents page), it will set the appropriate guide type.
If you use the keyword %STARTPAGE% for the guide type, it will be replaced by the appropriate type for Mobipocket or Epub, as specified by the current value of the configuration option Start page guide type. However, this has become unnecessary since all ereaders now recognise (or quietly ignore) the ‘text’ guide type.
Please note that Amazon may choose to ignore the start page and set the start location itself. See KB0138: Why does the start page not work on Kindle? in the Jutoh Knowlege Base.
You can specify drop caps in a paragraph style, or directly in a paragraph’s properties, via the Drop Caps tab of the formatting dialog. You can also use the command Format | Text | Drop Caps or the relevant toolbar button to show a dialog before applying drop caps to the current paragraph(s). This latter method creates an automatic style (direct formatting); you may wish instead to create a special paragraph style that you can apply to all the first paragraphs of your chapters.
Drop caps is supported when importing from DOCX and ODT files.
Note that drop caps may not be formatted consistently on all ebook viewers, because of the relationship between CSS, fonts and the different ebook viewer implementations and customisations. Most ebook viewers allow the user to change the font face, which can cause drop caps sizing and positioning to change.
Jutoh emits different CSS according to target format (Kindle or Epub/HTML). You can further customise drop caps CSS in several ways:
per paragraph or style, by specifying CSS properties in the Drop Caps formatting page, overriding the generated CSS;
per paragraph or style, by specifying custom CSS in the character style specified in the Drop Caps formatting page.
per configuration, by editing the Drop caps CSS configuration option;
If you edit the Drop caps CSS option, you will see this template:
font-weight: $FONT-WEIGHT$; font-size: $FONT-SIZE$; font-variant: $FONT-VARIANT$; float: $FLOAT$; margin-top: $MARGIN-TOP$; margin-bottom: $MARGIN-BOTTOM$; margin-left: $MARGINLEFT$; margin-right: $MARGIN-RIGHT$; line-height: $LINE-HEIGHT$; height: $HEIGHT$;
Jutoh replaces the variables with appropriate CSS for the target format and drop caps height. You can replace certain variables with actual values, and add extra CSS properties if you wish. Any further formatting (not custom CSS) in the specified character style, if any, will be merged with these properties, with the template’s properties taking precedence. If a variable has no value, the property will be omitted.
If you find drop caps isn’t your cup of tea, or isn’t consistent enough between devices, you can try setting the Display mode option in the Drop Caps dialog to Small Caps. This will format the first few characters or words of the paragraph in bold and small caps.
For more information, please see KB0004: How to format drop caps in the Jutoh Knowledge Base.
Small capitals can be applied to a named style or directly to text via the Font tab of the style editor. For convenience, you could add a character style called ‘Small Caps’ that just has this attribute defined.
When generating Epub and Mobipocket ebooks, Jutoh can generate small caps either by using the official font-variant CSS attribute, or by emulating it by emitting capital letters and shrinking the text. Adobe Digital Editions and some other ereaders do not support font-variant, but all ereaders will do a reasonable job using small caps emulation, so by default emulation is used. To use font-variant instead, clear the Emulate small caps configuration option. For those ereaders that support it (for example, Kindle readers, Apple Books, and the Azardi software), font-variant is a superior method since it renders real capitals larger than the lower case letters. However, if you’re targeting multiple ereaders, emulation is safer.
If you wish to add small caps to the first few words of your chapters, there’s a handy option in the Document Cleanup dialog (accessed from the Book menu) to do just that. Before using it, you’ll need to create a ‘Small Caps’ character style.
Some platforms require you to supply an ISBN for your ebooks. For example, to get your books into the premium Smashwords catalogue, you need an ISBN for each ebook. This needs to be separate for each book edition – paperbacks, hardbacks and distinct ebook editions for different platforms all need separate ISBNs. You can buy a set of ISBNs from the relevant agency (in the UK, it’s Nielsen), or you can see if your ebook publisher such as Smashwords can supply ISBNs.
Having got your ISBN, where do you put it? Go to the metadata in Project Properties (just click on the Edit button on the toolbar) and click on the ‘...’ button next to the Identifier field. Click Add to add a new value to this element, and choose Add ISBN. Enter the ISBN (just the number, including dashes) into the Value field. Now delete the original value, ‘Element 1’.
OK, so you have different ISBNs for different ebook editions – but you want to publish your ebook to different platforms, with different ISBNs, without having to edit separate Jutoh files for each edition. The way to accomplish this is via string tables. String tables allow you to set up substitution tables; since we can specify a different table for each configuration (Mobipocket, Epub and so on), we can put a variable called, say, %ISBN% into the ISBN value field, and substitute a different ISBN value from the different tables, depending on the current configuration.
Let’s assume that you are using two configurations, Mobipocket and Epub. The Mobipocket book is going to the Kindle store, and the Epub book is going to the iTunes store.
Click Edit on the toolbar, then the Strings tab. Click the ‘+’ button to add a new string table, and call it Kindle.
Click Add and enter ‘ISBN’ to add a new string whose name is ISBN.
Click on the value field (second column) and enter the ISBN for the Kindle store.
Repeat the above, adding a new string table called Apple Books and adding the second ISBN value.
Click OK to dismiss the Project Properties.
Click Edit on the toolbar again, then the Configurations tab.
Click on the Mobipocket configuration, and scroll down to the String Tables group.
Select ‘Kindle’ in the Project string table property.
Click on the Epub configuration, and scroll down to the String Tables group.
Select Apple Books in the Project string table property.
Click on the Metadata tab and enter %ISBN% into the Identifier field.
Press OK.
Now when you select a configuration, a different string table will be used and the %ISBN% variable will be filled in with the value of ‘ISBN’ in the appropriate string table.
If you have different editions of your book with the same format (for example, a Mobipocket file you put on your web site, and one that you upload to Kindle), you can just add another configuration (taking care to set the format property correctly) and a string table to go with it. So you can have as many configurations as you have sites that you upload to.
You can use the string table to change other things in your metadata and (if you check the Replace strings in content configuration property) your book pages.
For more information on string tables, see Chapter 14: Working with String Tables.
There is support for some Epub 3 features – you can switch Epub 3 support on by setting the Epub version configuration property to 3. The adaptations to Epub 3 are currently as follows:
The new-style table of contents file is generated, while the old NCX file is included for backwards compatibility;
Epub 2 guide types are converted to Epub 3 equivalents where possible;
if documents contain guide types, a ‘landmarks’ table of contents is generated;
metadata is generated using the new Epub 3 syntax, with mandatory date metadata;
XHTML files have the correct preamble;
JavaScript code can be embedded (also in ‘Epub 2.5’, i.e. Apple Books);
Eub 3 document structure can be added: see Chapter 20: Making Your Books Accessible.
narration audio files can be synchronised with content: See Chapter 17: Adding Narration To Your Book.
Jutoh is distributed with EpubCheck 3, which means it can check both Epub 2 and Epub 3 files if you have Java installed.
This chapter has described a variety of features that advanced books might need. For other miscellaneous topics, you may also find it useful to search Jutoh’s help by typing into the Search Help field in the Jutoh toolbar.
Next, we look at various strategies to cope with errors that might occur in your book.
Contents | Start | End | Previous: Chapter 23: Conditional Formatting | Next: Chapter 25: Troubleshooting Your Book