
Contents | Start | End | Previous: Chapter 20: Making Your Books Accessible | Next: Chapter 22: Formatting For Print
This chapter describes how you can use various features to improve the quality of text-to-speech output in Jutoh, whether played immediately to help with proof-reading, or with the goal of creating audio files. We will also describe how to create ‘speech archives’ so your customers can generate their own audio files.
Artificial speech generation has come on a long way since the early robotic-sounding voices, and technologies such as CereVoice come close to producing natural-sounding speech. So while text-to-speech doesn’t threaten the conventional audio book, text-to-speech can be useful for creating accessible documents and for proof-reading. Spoken documents are preferred by the majority of blind people over the more time-consuming Braille alternative. Jutoh has facilities for marking up text to improve pronunciation, insert pauses, switch voices and more, and it can use a variety of text-to-speech engines.
For how to create accessible Epub 3 files which have the potential for speech output, see Chapter 21: Making Your Books Accessible. The following will describe direct speech output using Jutoh, rather than Epub 3 output, although there is some overlap in features, such as lexicons and some aspects of markup.
Do take a look at the sample project Patient Advice Speech Sample.jutoh since it may help you understand concepts covered here.
If you edit Jutoh’s preferences (click Options in the toolbar) and choose the Speech page, there is a drop-down list of speech engines that are supported by Jutoh. These differ according to the operating system you are using.
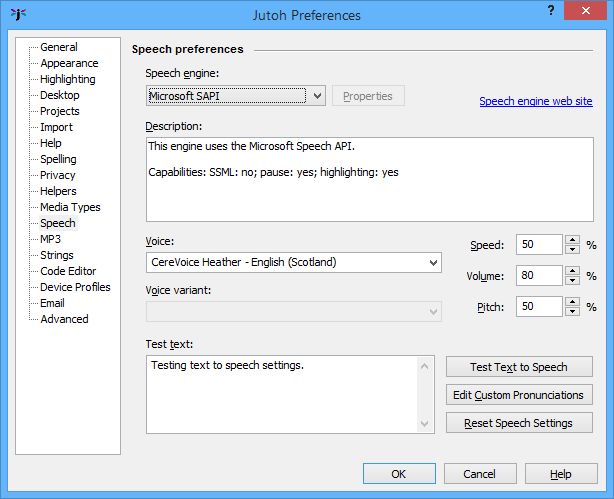
Jutoh’s speech preferences
Jutoh directly accesses some speech engines through their Application Programming Interface (Microsoft SAPI, Apple Speech Manager) and for other speech engines, it invokes an external process (eSpeak, Cepstral, CereVoice). When narrating text in the editor or generating speech audio files, Jutoh converts the project content to files in the source format required by the currently selected speech engine. For Microsoft SAPI, SAPI XML files are created, and for CereVoice and Cepstral, SSML files are created. For Apple Speech Manager, text with embedded commands is created. When generating audio files, Jutoh creates intermediate sound files – AIFF on Mac, WAV elsewhere – and can optionally convert them to MP3.
The Microsoft SAPI and Apple speech engines come with built-in voices, but you can buy more if you wish. The third-party speech engines eSpeak, CereVoice, and Cepstral can be accessed either by the operating system’s speech engine interface (SAPI or Apple Speech Manager) or using their own system, usually based on SSML and generally providing more flexibility than the operating system’s facilities. For example, with some engines you can specify a ‘pitch contour’ for a sentence or phrase when using SSML, but not when using SAPI. On the other hand, with a system like SAPI, you can switch between different voices and different underlying speech engines in the same document – you could start off using Microsoft Hazel, then switch to CereVoice Heather for a paragraph.
Strictly speaking, although SAPI and Apple Speech Manager are listed as speech engines, they just offer a general way to access underlying speech engines. When you select a voice in SAPI, you’re really selecting an engine-plus-voice, whether it’s Microsoft’s engine, or the CereVoice engine, or the Cepstral engine.
Voice data can sometimes be shared between methods of accessing speech engines. For example, if you buy CereVoice voices for use with SAPI, you can also use them for the proprietary, SSML-based CereVoice engine. When you configure CereVoice properties via the speech preferences page, it will search for installed SAPI voices and their licences and add them to its list of known voices.
For more information on setting up Jutoh for text-to-speech generation, please see Appendix B: Configuring Jutoh.
Next, let’s look at the concepts of configurations and speech profiles, which control various aspects of speech creation.
As we’ve seen elsewhere in this book, configurations determine what formats to generate (and much else besides). Audio files are created by a configuration whose option Generate MP3 is checked. By default, Jutoh creates a configuration called ‘MP3’ but you can create one or more yourself from the Project Properties/Configurations panel.
A speech profile is similar to a configuration, in that it controls settings that can be different per configuration: for example you can have configurations (with associated speech profiles) for creating speech with different speech engines, different voices, different speeds, different content, and so on. Speech profiles exist because it would clutter up configurations too much to include all speech-related settings. So instead, you select which speech profile you want to use in the Speech profile configuration option. You might only have one speech profile for all configurations – the default profile – or you could have different speech profiles for different configurations.
Engine, voice, speed and similar properties initially use the global settings (set in Preferences/Speech) as mentioned in the previous section; you can override them per-profile. There are also options for enhancing the text for clarity, such as whether to include a spoken prefix in front of list items and table rows and columns.
Speech profiles are edited in the Speech tab of the Formatting Palette, so you need to have a document open to edit the profiles. If there are several profiles, the one currently associated with the current configuration will be marked with an asterisk. Double-click on a profile to make it the assigned profile for the current configuration. Here’s a screenshot of the Profiles tab showing the default speech profile:
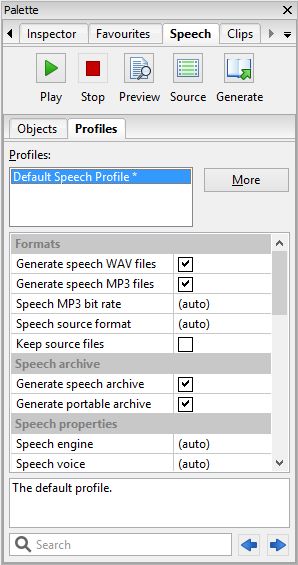
The Profiles tab in the Formatting Palette
To add more profiles, click on the More button and then on Add. From the More menu you can delete profiles and move them up and down in the list; and there are menu commands for setting the global speech and MP3 generation settings which are used when the corresponding profile settings are set to (auto).
The available profile properties are described in detail in Appendix F: Speech Profile Reference.
You can annotate the content in your project so that regular formats such as Epub and Kindle are untouched, but text-to-speech generation is improved. You can add pronunciations for specific words, pauses, pitch and voice changes, and more. Because there are different speech standards and implementations, markup may or may not be respected in a particular context of engine and voice usage.
Markup is achieved using the speech and pause objects, or ‘tags’ in HTML terminology. The principles of tags are described in Chapter 16: Working With Tag Objects. Speech objects have start and end tags, while pause has one tag. These objects have speech properties; you can set one property value, or several, as required. The speech properties are documented in Appendix E.
Here’s an example of markup:
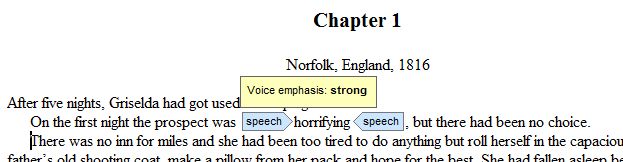
Speech markup with a tooltip showing
In this example, the speech object has a single property, Voice emphasis, set to ‘strong’. A tooltip appears when you hover over the object, showing the property values.
To create markup, click on the Speech tab in the Formatting Palette, and then click on the Objects sub-tab. Now select some text in your project, and then click Speech Object. A property editor will be shown, and you can edit properties such as Speak as and Alias. Often, available values are shown when you click on the property value and then on the arrow that appears. When you press OK, you will see the start and end objects enclosing the previously selected text.
You can also add a pause with Pause Object, and a new lexicon word with Pronunciation based on the selected word in the editor. If you have lexicon documents in your project, you will be offered a choice of lexicons, or it will give you the chance to create a new lexicon document.
To edit an existing object, click on the object, or you can navigate between objects using Previous and Next in the Speech palette, and press Edit to edit the current object. To see all the speech objects in your document or project, go to the Inspector tab in the Formatting Palette and choose Elements.
Here’s a screenshot showing the Objects tab, showing the properties of the object at the current caret position, in this case an object that changes the voice emotion to ‘calm’:
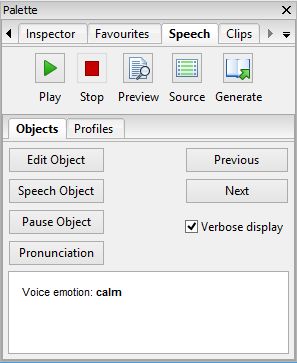
The Objects tab in the Speech palette
Initially, the speech objects will be displayed in the editor using just the object name, i.e. speech. Check Verbose display to show all the properties that have been set for the object. This setting can also be changed via Preferences/Highlighting.
You can add speech and pause objects, and pronunciations, from the Format | Insert | Speech menu and the context menu. So you can also use the keyboard shortcuts associated with these commands, and if necessary customise them.
Ideally, we would use Epub 3 property syntax throughout. However, Epub 3 does not have as much expressive power as SSML, so property values conform to a mixture of Epub 3 and SSML. Where possible, these will be translated into the currently selected format.
Note that you can also define speech markup in ordinary paragraph and character styles, via the Advanced tab of the style editor. For example, you could set the property Content before in a heading style to insert the word ‘Heading’ in front of each chapter heading. For this not to interfere with other formats, you may wish to create multiple style sheets and specify which one to use in the Style sheet configuration options.
For more about the speech properties that you can use in markup, please see Appendix E: Speech Markup Reference.
If you find you are wanting quick access to the Speech tab and also other tabs such as Styles, you can show them alongside each other by dragging a tab to one of the four edges of the formatting palette. In this screenshot, the Styles tab has been dragged to the right-hand edge of the palette.
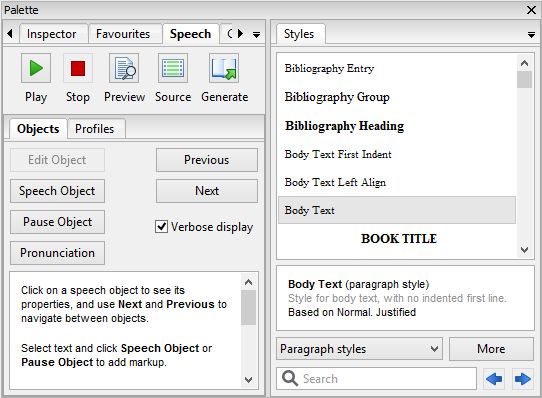
Showing two tabs simultaneously
Using the tools in the Speech palette shown in the screenshots above, you can play (i.e. immediately read speech for the cursor position), pause, stop, and preview speech, view the source code, and generate the audio files. (Pause is not supported in speech engines that are invoked as an external process, such as Cepstral and eSpeak.) You can use the command View | Speech | Speak Selection (Ctrl+Alt+K) as a quick way to start and stop playing speech.
When playing speech, you can check the speech profile option Highlight text to highlight sentences as they are read. The text will be scrolled to the current position being read. This currently works for SAPI on Windows only. Note that if using this option, the undo history will be cleared before and after narration, although you can still edit the text as it is being spoken.
Playing and previewing occurs for the selected text, or if there is no selection, from the current text cursor position. The preview option generates a WAV file and invokes an external audio player, so you can preview a chapter or part of a chapter and navigate to different points using the audio player.
You can configure the audio player that will be shown, by going to Preferences/Helpers, selecting ‘WAV files’, clicking Configure Viewers, and adding a player that is installed on your system. (On Mac, this will configure the player that will play AIFF files which are generated on this platform.) To avoid showing a menu that includes the default system audio player, clear Show this command for the Default viewer.
NOTE: When previewing a selection with the Preview button, or playing an MP3 file, it is recommended that on Windows you use a simple audio player such as Media Player Classic and not Windows Media Player, since WMP can hold on to the file even if you close it, causing an inability to generate the audio file a second time.
You can configure a suitable for viewer for displaying XML SSML or SAPI files when pressing the Source button, by repeating the above configuration but for ‘XML files’. You could use a text editor, or special XML viewer. A useful little XML viewer available for free on Windows is ‘XML Viewer’ by MindFusion.
Sometimes speech engines need help in pronouncing difficult words. You can create lexicons containing pronunciations, using the lexicon document feature. Create a new lexicon document by clicking on the Documents toolbar button and then Add Lexicon Document. You can add new lexicon entries using the New button in the lexicon document, or via the menu command New | Pronunciation in the Objects tab of the Speech palette.
Lexicons allow you to use phonetic alphabets, or ‘aliases’ (sounds-like). Unless you’re a wizard at phonetics, you’ll probably just want to use aliases to clarify pronunciations or expand abbreviations. Note that different speech engines and voices will pronounce words differently, just to make life more interesting. If you need to support different phonetic alphabets, you can specify multiple alphabets and phonemes for each entry in your lexicon, and then select the alphabets that will be used for the current speech profile via the Lexicon alphabets profile property.
You can also specify pronunciations where difficult words occur, by marking up content with Alias and Phoneme properties as described above.
Specify which lexicons will be used in your speech profile using tags in the lexicon documents and in the speech profile. Jutoh will generate the required lexicons as PLS files, or, if you check Inline pronunciations, Jutoh will use the lexicons to replace text before the speech is generated, so that separate lexicon files are not required. Please note that for text-to-speech, currently Jutoh only supports inline pronunciations, and does not load generated lexicon files.
By default, all lexicons will be used. Let’s expand on the ability to specify which lexicons to use for a given configuration. For example, say you have a lexicon you wish to use in the configuration ‘Verbose MP3’, but not in the configuration ‘MP3’. ‘Verbose MP3’ will expand abbreviations. Select your ‘Verbose MP3’ configuration, and create a new speech profile using the Speech palette, called ‘Verbose Speech Profile’. Double-click this profile to associate it with the current configuration. In ‘Verbose Speech Profile’, set the Lexicon tags property to the word ‘verbose’ (a made-up tag name). In your lexicon, or lexicons, add the ‘verbose’ tag in the lexicon properties dialog. Now all lexicons matching this tag will be used, meaning that the configuration ‘Verbose MP3’ will use these lexicons.
If you have lexicons in PLS format and you don’t want to import them into a lexicon document for interactive editing, you can add them as media resource documents or source documents. A source document allows you to edit the XML in situ, although it’s more error-prone that using a lexicon document which automatically generates the XML. You can specify the PLS documents to use in Project Preferences/Accessibility/Speech. This allows you to specify alphabets and languages for the PLS lexicons in a way you can’t when simply adding a PLS resource – this information can then be used when generating Epub 3 files. You can also specify string tables to be used for generating PLS lexicons, although this method has been superseded by the lexicon document facility.
There’s yet another way pronunciations can be specified – using the global custom pronunciations list. Go to Preferences/Speech, and click Edit Custom Pronunciations. Now you can add natural language aliases for words. Unlike with normal lexicons, you can specify that a word should match a substring in the book text: place an asterisk (‘*’) in front of the word to be found. This is useful for replacing, say, ‘.co.uk’ with ‘dot co dot UK’ within domain names. Note that custom pronunciations reside on the user’s PC and are not saved with a project. However, they will still work for portable speech archives (see below) since the pronunciations are processed before saving the project documents to the archive.
A speech archive is used to recreate speech using a text-to-speech system without needing the original content creator to generate a set of sound files. This has the following advantages:
A licence to distribute speech created using proprietary voices is not required, since the end-user is responsible for creating the files.
The file is much smaller than a set of audio files.
The end-user can choose different voices, text-to-speech engines, speed and MP3 quality to suit his or her needs.
Compared with a solution using Epub 3 or other format and software to render speech from it, there is more flexibility in speech markup leading to potentially higher quality speech.
Almost everyone has access to equipment that can play audio, whereas Epub 3 and digital talking book files require specialised software or hardware.
The free demo version of Jutoh can be used by anyone to create audio from a speech archive.
Let’s also consider the disadvantages compared with using an Epub 3 or Digital Talking Book solution:
The user cannot navigate an audio file in a flexible manner compared with Epub 3 or DTB.
Jutoh is required to generate the audio file and so a speech archive can’t be used directly on a mobile device (but after speech generation, the files can of course be transferred to a portable device).
In the absence of greater availability of hardware and software that reads a digital book directly, the advantages of the speech archive may outweigh the disadvantages. You can of course also generate an Epub 2 or Epub 3 file which can be read directly by some hardware and software.
A speech archive can contain one of the following formats: binary document, SSML, SAPI, Apple Speech Manager text or plain text. Binary (or ‘portable’) documents give the most flexibility since any of the other formats or speech engines can be used to generate speech, whereas with engine-specific formats, the user is restricted to using a compatible operating system and engine. By default, Jutoh generates portable speech archives.
To generate a speech archive, check Generate speech archive in your speech profile.
To test the speech archive you have just generated, go to the Files tab of the Jutoh Control Panel, find the SPARCH entry and double-click it. (You can also open the .sparch file via File | Open.) The Speech Archive dialog will be shown, as shown below.
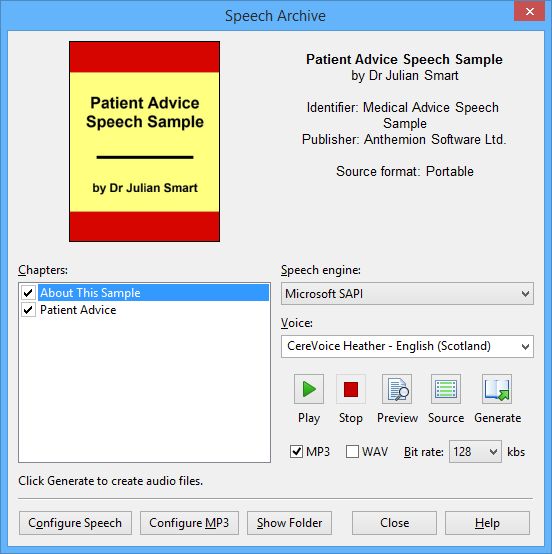
The speech archive dialog
To use this dialog, adjust the engine, voice, and other parameters as required, and press Generate to create MP3 files for all selected book chapters. They will be generated in the background; if you wish, you can close the dialog and watch the status bar to see when file creation has finished. The folder containing the generated files will be shown when the file creation has finished.
Here are six techniques you can use to improve speech quality. For details of speech properties, please see Appendix E: Speech Markup Reference. Be sure to check out the sample file Patient Advice Speech Sample.jutoh, which demonstrates all of these techniques.
The Say as property gives hints to the speech engine about whether to pronounce enclosed text as individual characters, or a telephone number, or a date, and so on. Although speech engines differ in their native support of this property, by default Jutoh emulates it for the values characters (spell out the letters), digits (spell out the digits) and telephone (spell out the digits and create suitable pauses between groups of numbers). Jutoh will emit suitable text to feed to the speech engine, saving you the bother of creating an Alias with equivalent spoken text.
Sometimes it’s useful to simply tell the speech engine what natural language to say in place of the actual text in the book, for example to expand an abbreviation, correct a difficult pronunciation, or expand the pronunciation of a date or time. You can do this with the Alias property in an object that encloses the relevant text; or to apply it automatically wherever the text occurs, use an entry in a lexicon document. Similarly, you can specify the pronunciation phonetically with Phoneme in the text or using a lexicon entry. This requires some knowledge of phonetic alphabets so most people will probably prefer to use aliases, either via markup or lexicon entries.
There is another mechanism that can be useful – custom pronunciations, accessed via Preferences/Speech. This is a list of words and replacement text, similar to aliases, but with the added benefit that if you place an asterisk (‘*’) in front of the word to find, the word will match text anywhere inside a word and not just the whole word. As an example, this allows you to replace ‘.co.uk’ with ‘dot co dot uk’ within web domains.
Normally, you will use speech and pause objects to refine speech behaviour, changing the properties in the objects as required. But there’s another method – apply the properties to paragraph and character styles. Then the speech markup won’t be immediately obvious in the editor, but you can save a lot of time if you can improve speech just by editing styles that are used throughout the project.
One example would be clarifying chapter headings. If the chapters aren’t prefixed by a chapter number, or an obvious indication that they are headings besides the visual style, then you could edit the ‘Heading 1’ style and in the Advanced tab, set the property Content before to ‘Chapter: ’ This will be inserted in front of all paragraphs styled with ‘Heading 1’, giving a better hint to the listener that this is the start of a new chapter. (An alternative approach in this case is to enable automatic numbering for headings, in Project Properties/Fields & Numbering.)
Note that the Content before and Content after properties apply to all configurations, not just speech. So to avoid changing the heading content for all possible formats, you would need to use different style sheets for different formats. To do this, duplicate the default style sheet, change the ‘Heading 1’ style for your second style sheet, and set the ‘MP3’ configuration to use the new style sheet via the Style sheet configuration option.
Another example: say you have a character style that you use for telephone numbers. Edit this character style, and set Say as to telephone. Now all telephone numbers marked with this style will be spoken with individual digits and pauses between number groups.
Punctuation affects how content is read, and adding commas and semicolons can break phrases into more manageable chunks. Parentheses can also result in a change of intonation. Punctuation can be added in the Alias property as well as regular content. If you don’t want to change the content’s punctuation, you can add pause objects, for example to give more breathing space after a heading. As described above, you can add the pause to a paragraph style rather than an actual object, and the paragraphs will automatically gain a pause (after the heading, before, or both, depending on the Pause property value).
You can bracket pieces of content in condition objects, as described in Chapter 23: Conditional Formatting, so that content will appear in one format, and not another. You could use this to add extra spoken content, or remove some content for a particular configuration that is intended to be a more brief version of the document. Since audio files are harder to navigate and you can’t instantly grasp the document structure using visual cues as you can with a conventional document, it’s a good idea to briefly describe what the listener is about to hear.
If you provide alternative text for an image using the image properties editor, it will be spoken in place of the image, giving at least some idea of what surrounding text may be referring to. Similarly, a table’s title and description may help clarify the layout of the table before the data is read and prepare the listener for it.
In this chapter we have learned how to improve text-to-speech creation and make speech archives that other people can use to create their own audio files. Next, we will investigate the ways in which you can prepare your books for PDF file creation, including for print-on-demand.
Contents | Start | End | Previous: Chapter 20: Making Your Books Accessible | Next: Chapter 22: Formatting For Print