
Contents | Start | End | Previous: Chapter 11: Working With Indexes | Next: Chapter 13: Working With String Tables
In this chapter we explain how to work with styles – important for formatting your books consistently, and also important for such features as automated table of contents creation.
Style sheets are important in controlling the appearance of a book when converted to the supported formats. Style sheets contain styles for paragraphs (paragraph styles), spans of text (character styles), lists (list styles), and boxes and pictures (box styles). You can have more than one style sheet, and switch between them by changing the Style sheet property in a configuration, or by having multiple configurations specifying different style sheets. Most users will probably stick with one style sheet.
If your document appearance isn’t as you wish, instead of editing the formatting within the editor, first try editing the style sheet, since this will affect the whole document if named styles have been applied consistently. For example, suppose that the first paragraph in each section uses the style ‘Body Text’, which is not indented. You may wish the first paragraph of each section to be indented; so you could either change the style for each such paragraph, or you could adjust the definition for ‘Body Text’ to match the indentation of ‘Body Text First Indent’.
For Epub and Mobipocket formats, Jutoh generates a Cascading Style Sheet (CSS) that contains equivalent definitions for the Jutoh style sheets.
Jutoh supports four kinds of named style:
Paragraph style. This kind of style applies to an individual paragraph, and you can see available paragraph styles in the drop-down control above the editor.
Character style. This kind of style changes the formatting for a span of text within a paragraph. You can apply character styles using the context (right-click) menu, choosing Styles and then Character Styles. There’s no drop-down control for character styles, but to see the named style at the current text position, you can use the Formatting Palette.
List style. This kind of style defines how list items are formatted at each depth; the two list buttons on the formatting toolbar simply apply two of the standard list styles (bulleted and numbered).
Box style. This kind of style defines size, border, margin and other attributes that used by box-like objects such as text boxes and images.
There is always a named paragraph style for any given paragraph, but a given span of text may not necessarily have any named character style. If more than one named style applies to text, their attributes are combined, in the order paragraph, list, and character (with each style overriding the previous). You can remove the character style from a span of text with Format | Text | Reset Text Formatting.
You edit style sheets in the Project Properties dialog, as shown here:
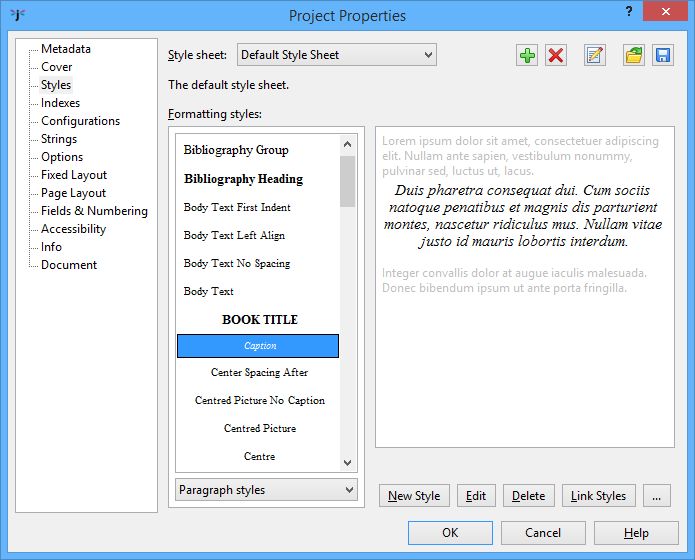
The Styles page in the Project Properties dialog
A default style sheet is provided, including these paragraph styles: ‘Normal’, ‘Body Text’, ‘Body Text First Indent’, ‘Heading 1’, ‘Heading 2’, ‘Heading 3’, ‘Heading 4’, ‘Comment’ (stripped out of all generated books), ‘Headers’, ‘Footers’, ‘HTML’ (output verbatim to HTML-based formats), ‘Centre’, and ‘Right’.
You can edit the attributes (visual characteristics such as indent or font) of all styles, and add your own. Be careful when deleting styles, though, since your book may not work correctly if styles that it uses are missing (Jutoh will warn you about this, and you can then add them back or replace the styles in the offending paragraphs.)
By default, the dialog shows the paragraph styles. You can view the character styles, list styles, box styles, or all styles at once by using the drop-down control under the style list.
You can also edit styles from the Formatting Palette by right-clicking on a style and selecting Edit.
To edit the attributes of a selected style, click on Edit. The style dialog will be shown; for paragraphs, it will look like this.
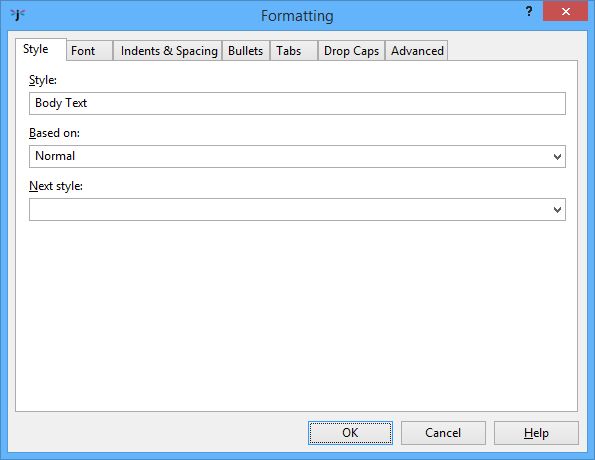
Paragraph style dialog: Style page
The Style page shows the name of the style, the ‘base’ (or parent) style from which the style inherits, and an optional ‘next style’ that indicates what style will be set when you press return on a style of this kind. For example, a heading style might have a next style of ‘Body Text’ so you don’t have to change the style manually back to ‘Body Text’ after writing a heading.
The Font page lets you adjust font-related attributes that will apply to the whole paragraph.
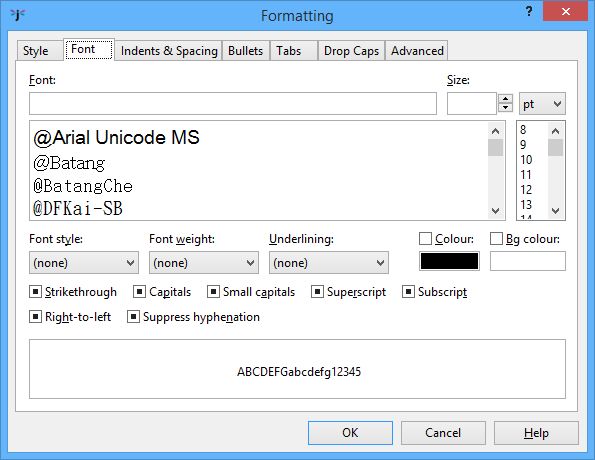
Paragraph style dialog: Font page
In the example above, no font attributes are actually set, but the style will inherit any attributes from the parent style. A paragraph style or at least its parent needs to have the size set (12 means ‘normal text size’) and also the font name, which should usually be kept to something simple such as Times New Roman, Arial (or Helvetica), or Courier New.
The next page is Indents & Spacing, which deals with indentation, line and paragraph spacing, and also text alignment, whether a page break will be inserted in front of the paragraph, and the outline level (an optional indication of heading depth – you can ignore this).
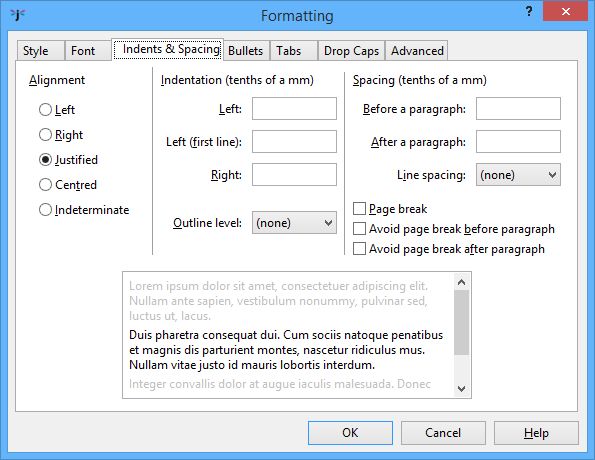
Paragraph style dialog: Indents & Spacing
The alignment buttons determine whether the paragraph will be left-justified only, right-justified, justified (straight on both sides), centred, or indeterminate (no alignment specified unless inherited from a base style). Note that if you specify justified text, Jutoh won’t show it in the editor but it will usually be respected by the ebook reader software.
Indentation and paragraph spacing values are specified in tenths of a millimetre, which will be converted either to relative ‘em’ units, or to mm, when written to HTML, Epub or Mobipocket formats (see below for details of the conversion). You can specify both the left indent and first line left indent, and also the indent for the right-hand-side. In Mobipocket KF7 format, the right indent is ignored, and a left indent will be shown using a single, standard indent size (except for the first-line indent, which can be customised).
You can specify the before-paragraph and after-paragraph spacing. For normal text paragraphs, you’ll probably specify at most an after-paragraph value. For headings, it’s likely you’ll specify spacing before and after the paragraph. If you leave these values empty, they will either inherit values from the base style, or will effectively be zero.
It’s worth remembering that when the configuration option Use relative dimensions is checked, Mobipocket KF7 ignores spacing values that are less than 25 tenths of a mm.
Line spacing – the spacing between lines within a paragraph, not between paragraphs – is specified as ‘none’ (takes a default or inherited value), single spacing, or in 0.1 increments up to 2 times the normal line spacing.
You can ignore the Bullets and Tabs pages as far as ordinary paragraphs are concerned, since bullets are only defined as part of a list style, and tabs are not supported in Jutoh (or most ebook formats).
The Drop Caps page lets you specify a first drop caps letter, or letters, for two or more lines to wrap around.
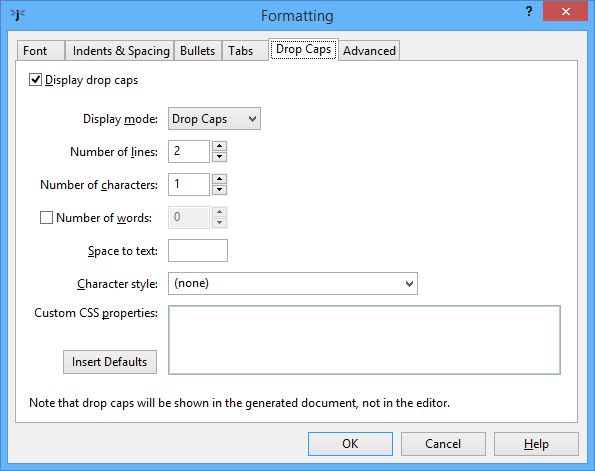
The style editor Drop Caps page
You can specify the number of lines that the drop caps will take up, and how many letters to use. You can even specify that the whole word should be dropped. Space to text is optional: if omitted, Jutoh will generate a default margin between the drop caps and the following text. It can be specified in any CSS-compatible units, such as em, pt and cm. Also optional is a character style to format the drop caps with. If specified, this can contain further formatting such as a font face name or capitals text effect. The Custom CSS properties can contain CSS properties that will replace the CSS that Jutoh generates. You might need it if the CSS is highly dependent on the font used, for example. You can also specify custom CSS via the character style, or via the configuration option Drop caps CSS.
If you set Display Mode to Small Caps instead of Drop Caps, Jutoh will highlight the first few characters or words in bold and small caps in place of the drop caps effect. This formatting can be more consistent between formats and devices. The small caps implementation for Epub and Kindle formats is affected by the configuration setting Emulate small caps.
Jutoh doesn’t visually show the drop caps (or small caps) in the editor, except for a larger letter at the start of the paragraph if View | Text Highlighting is switched on.
In the Advanced page, you can also specify whether to give this style custom CSS that will be used directly instead of using the Jutoh-generated CSS (for HTML, Epub and Mobipocket formats only). This gives you more control over how the content will appear on the rare occasions that Jutoh-generated styling is inadequate. Remember that if you check Use custom CSS, any changes that you make to the style attributes using the style dialog will have no effect in the generated ebook because Jutoh is no longer in control of the CSS for this style.

The style editor Advanced page
CSS customisation is described in detail later in this chapter.
To edit a character style, first view all character styles by selecting ‘Character styles’ in the drop-down box under the style list, then select a style, and click Edit. The character style editor has a Style page, similar to the paragraph style editor but without the Next style field, and a Font page. No other attributes apply to character styles.
To edit a list style, first view all list styles by selecting ‘List styles’ in the drop-down box under the style list, then select a style, and click Edit. The list style editor has Style, Font, Indents & Spacing, and List Style pages.
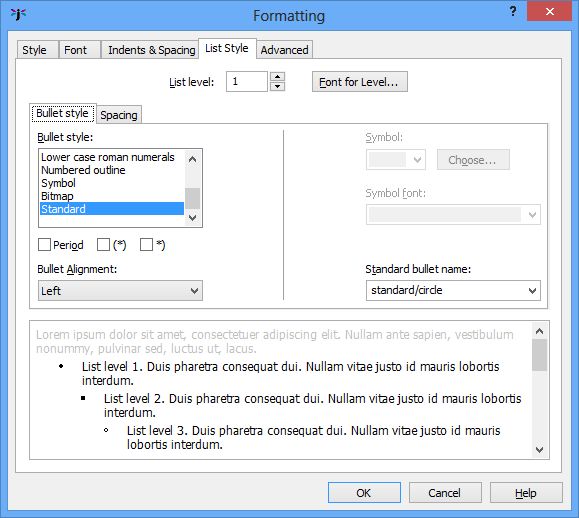
List Style page
List styles work on the principle that lists can potentially be nested, with different bullet or numbering styles depending on the level (depth) of the list. When you are editing an actual list in the Jutoh editor, pressing the Tab or Shift+Tab keys will increase or decrease the level of the current paragraph in the list.
On the List Style page, click on List level to edit a different level (up to 10), and then adjust the attributes to be shown for that level. The attributes listed on the Spacing sub-page will be merged with the attributes on the Indents & Spacing page.
Various bullet styles can be defined, but it’s best to keep it as simple as possible because not all book formats and readers allow complex bullets. For bulleted lists, it’s best to keep with a Standard bullet style and then select from the pre-defined bullet types in the Standard bullet name dropdown. Even this may be ignored by the ebook reader if it chooses to use its own bullets.
In the Spacing sub-page, define indentation appropriate for the current level.
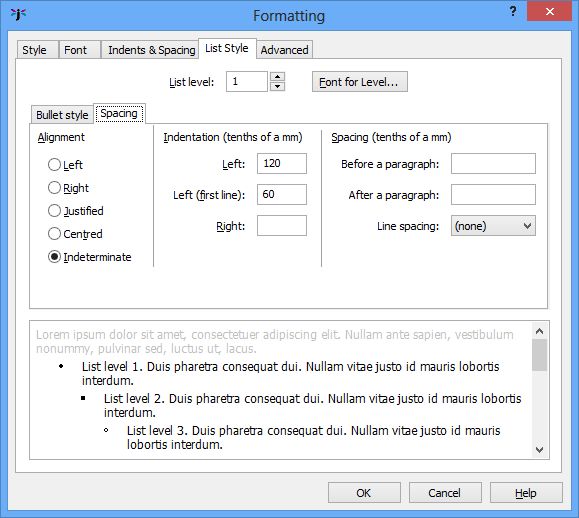
List Style Editor spacing sub-page
The first line left indent defines the distance between the left margin and the bullet, while the left indent defines the distance between the left margin and the start of the list item text. These values may be ignored, depending on format and ebook reader.
List styles are the only way to achieve bulleted or numbered paragraphs (you can’t define bullets per paragraph).
Note that the bulleted and numbered list buttons in the toolbar are hard-wired to apply the styles called ‘Bullet List 1’ and ‘Numbered List 1’. So if you delete either of these styles, the relevant button will no longer work. To apply a different list style, use the Format | Bullets and Numbering menu command, which will give you a choice of list styles to apply, along with the option to renumber the list.
For some Epub and Kindle devices, you can specify a custom bullet image for lists. This is how:
Add a media document with a bitmap, e.g. ‘media/bullet1.png’.
Edit or create a list style, and in the List Style tab, click on Bitmap for the bullet style and enter or select the media document path under Standard bullet name, e.g. ‘media/bullet1.png’.
Format a list item with this style.
Unlike regular images inserted into Jutoh, resource images are not converted to JPEG automatically, so the type you add is the type that will be output to the ebook. Therefore you need to use types that are known to work with the targeted ereader; these are usually PNG, GIF and JPEG.
You will need to experiment with bullet bitmap size since they render at different sizes on different ereaders, but you could try around 14x14 pixels.
You can edit size, floating mode, margins, and border attributes for box styles; for more information, see the description of the picture property dialog in Chapter 10: Working With Pictures.
To create a new style, click on New and choose from paragraph, character, list style or box style.
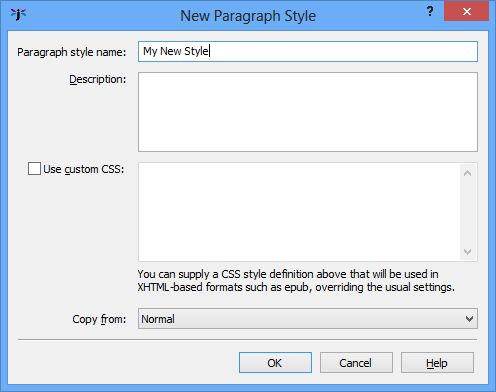
New style dialog
Enter the name, optional description, any custom CSS, and a style to use as a template. Note that the value of Copy from in this dialog will only be used to set up initial attributes for the new style, and will not be the value of the ‘base’ (parent) style in the new style.
There are various methods for applying named paragraph styles to text in your document:
Select a paragraph and choose a style from the drop-down style control in the editor toolbar;
select a paragraph, click Format | Styles, choose a style and click OK;
right-click (or control-click on Mac), choose Styles in the context menu, and click on a style name.
use custom keyboard shortcuts and Favourites, as explained in Appendix B: Configuring Jutoh.
You can also apply named character styles to ranges of text:
Select some text, click Format | Styles, choose Character Styles, choose a style and click OK;
right-click (or control-click on Mac), choose Styles | Character Styles in the context menu, and click on a style name.
use custom keyboard shortcuts and Favourites, as explained in Appendix B: Configuring Jutoh.
Note that when a character style is applied via the context menu, it is merged with the attributes in the selected text, forming a new automatic style (see below), unless there are no attributes in the selected text, in which case the original character style name will be retained. So if it’s important that the specific character style name is retained in your book, first reset the existing character styling for the selected text using Format | Text | Reset Formatting.
If you apply direct or ad hoc styling – that is, apply attributes such as bold, centring, paragraph spacing, and so on directly without choosing a named style with those attributes – then Jutoh will construct an automatic style with those attributes. You can tell an automatic style by the presence of ‘+’ symbols in the name, for example ‘Normal + Centre Alignment’. Automatic styles are stored in each section document, not in the editable style sheet, so they won’t be visible except in the drop-down style control.
If you import from a DOCX (Word) or ODT (OpenDocument Text) file, you may find a lot of your content is unexpectedly formatted with automatic styles. If this is the case, your original document also had automatic styles but your word processor hid this by showing only the basic style name in the drop-down style control.
It’s becoming a familiar refrain in this book, but avoid use of automatic styles whenever possible. When you need to apply formatting, consider if you can create a named style for this purpose, such as ‘Centred Picture’ or ‘Picture Caption’. If you change your mind about the details of formatting later, you can then simply edit the named style rather than dozens, hundreds or even thousands of occurrences of the formatting throughout your document. You’ll end up with a much better and more easily-edited document if you take the trouble to create and use named styles. Also, if you use a rational naming scheme for headings, you’ll find it much easier to persuade Jutoh to create an advanced table of contents. And finally, with named styles, Jutoh won’t have to generate so many automatic styles in the generated ebook, which could reduce its efficiency and increase file size.
When exporting to ebook formats other than Epub and Mobipocket, paragraph dimensions for indentation, left margin, right margin, line spacing and paragraph spacing are specified in absolute dimensions (tenths of a mm). When exporting to epub and Mobipocket, Jutoh will convert these dimensions to em, which is a unit based on the current text size, or to mm, depending on the value of the Use relative dimensions configuration option. You can adjust the scale factor used for the conversion using the Options page in the Project Properties dialog.
Note that when marking up individual spans of text with either a character style containing a text size, or an ad hoc text size, the text size will be generated as an absolute point size, not in ems. This is because if it were in ems, the relative size would combine with the paragraph relative text size. So, please avoid using text size in ad hoc styles – define text size in paragraph styles where possible. Otherwise you will see inconsistent text size when scaling the ebook. You can eliminate non-paragraph styling by selecting text and then choosing Format | Text | Reset Text Formatting.
If you find that Jutoh’s CSS style creation is inadequate for any reason, you can tell Jutoh what CSS style to use instead of the current definition, via the Advanced page in the style editor. These will be used only for HTML, Epub and Mobipocket file generation. The CSS customisation fields are illustrated in the style editor dialog shown above.
You can see the current CSS definition as it will be output to Epub and Mobipocket. Check Use custom CSS and edit the definition if you want to use an alternative definition. Remember that if you subsequently make changes to the style through the usual dialogs, it won’t change your CSS definition until you clear the Use custom CSS option.
Note that if you customise style definitions, or use the HTML style, be sure to click Check after generating an Epub file in case you have introduced HTML errors. When you check a project, Jutoh invokes Adobe’s EpubCheck tool to examine the Epub structure and content. You need to have Java installed for EpubCheck to work.
If you need further CSS customisation, you can edit the sheet properties by clicking the Style Sheet Properties  button and checking Use custom CSS.

Style Sheet Properties dialog
Add any CSS definitions you like in the field, and they will be added to the beginning of the CSS file that Jutoh generates, as well as the individual style definitions generated by Jutoh or specified explicitly by the user.
In some cases, Jutoh will use the name of a style to influence the e-book output.
‘Heading 1’, ‘Heading 2’ and so on are output to HTML as h1, h2, etc. You can change the value of the Heading style prefix configuration property to a different prefix, or clear it to prevent Jutoh generating HTML heading styles. Since the ebook reader will apply its default heading styling to paragraphs marked as headings, you may find precise control of heading appearance easier to achieve if you switch this off in your configuration.
The ‘HTML’ paragraph style outputs the content of the paragraph directly to the HTML file without processing.
The ‘HTML Text’ character style outputs the spanned text directly to the HTML file without processing.
The word ‘Preformatted’ in a style indicates that HTML should use the pre tag.
When creating a new project, or editing an existing one, you can import style sheets that were previously saved with a .stylesheet extension. In the Styles page of the project properties dialog, import style styles with Import  , and save selected style sheets (one or more) with Save
  . When importing, stylesheets will replace any existing style sheets of the same name.
Please note that these are not CSS style sheets – they are Jutoh-specific binary files. You will be warned if you attempt to import a regular .css file.
You can search for paragraphs with particular named styles, and replace them with other styles, using the Find and Replace dialog, available from Edit | Find (Ctrl+F).
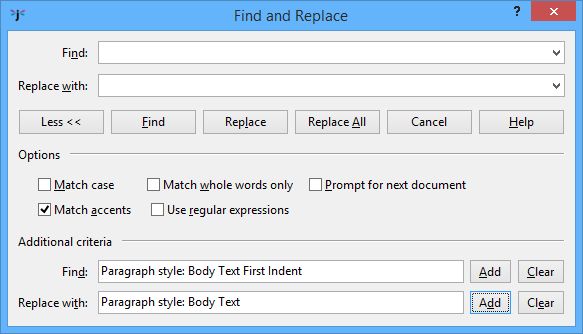
The Find and Replace dialog
Click on More >> if the extra options aren’t currently shown. Then click Add and choose a paragraph style, for each of the Find and Replace with criteria.
You can use asterisks in the style to find, so for example the string ‘Body Text*’ will match against ‘Body Text’, ‘Body Text First Indent’, and also automatic styles derived from ‘Body Text’ styles, such as ‘Body Text + Centre Alignment’.
You can replaces styles on a per-configuration basis by using the Paragraph style substitutions configuration property. For example, a value of ‘Normal: Normal Justified’ will temporarily replace all instances of ‘Normal’ with ‘Normal Justified’ when the book is compiled. This can be useful to apply minor tweaks without the need to maintain different style sheets for different configurations.
In each configuration there are two properties that let you use styles to include or exclude content.
In Paragraphs to exclude, you can specify the comma-separated paragraph styles whose paragraphs should be excluded from the book. You can use ‘*’ to mean all characters, for example ‘Only*’ will cause all paragraphs with a style name beginning ‘Only’ to be excluded, except for those specified in Paragraphs to include.
In Paragraphs to include, you can specify the comma-separated paragraph styles whose paragraphs will be exempt from exclusions. You can use ‘*’ to mean all characters. For example, if this property has the value of ‘Only Epub’, paragraphs styles with ‘Only Epub’ will be retained, but (assuming ‘Only*’ in Paragraphs to exclude), all other paragraphs whose style name begins with ‘Only’ will be removed. Thus you can include or exclude paragraphs in your document depending on the configuration.
When a new project is created, Jutoh sets up some paragraph styles for each format prefixed ‘Only’, for example ‘Only Epub’, which you can use together with the configuration properties. Of course, you may need several styles per configuration for different formatting, for example ‘Only Epub Centred’. If you use ‘*’ in your properties, you can specify variants so you don’t have to mention every single style to include or exclude.
Here’s another example. Say we are going to create a Smashwords OpenDocument file which says ‘Published by Acme at Smashwords’, but all other formats will just say ‘Published by Acme’. We create two paragraph styles, one called ‘Only Smashwords OpenDocument’ and another called ‘Non-Smashwords Formats’. In our title page, we have the two paragraphs:
Published by Acme at Smashwords
Published by Acme
The first is formatted with ‘Only Smashwords OpenDocument’, and the second with ‘Non-Smashwords Formats’. In our ‘Smashwords OpenDocument’ configuration, we set these properties:
Paragraphs to exclude: Only*,Non-Smashwords Formats*
Paragraphs to include: Only Smashwords OpenDocument*
In all other configurations, we keep the default properties, for example for ‘Epub’:
Paragraphs to exclude: Only*
Paragraphs to include: Only Epub
Now when we compile the ‘Smashwords OpenDocument’ configuration, all ‘Only*’ styles will be excluded except for ‘Only Smashwords OpenDocument’, and ‘Non-Smashwords Formats’ will also be excluded. When we compile another configuration, such as ‘Epub’, the ‘Non-Smashwords Formats’ paragraphs will be included by default (it doesn’t need to be mentioned explicitly). Since we are using wildcards (‘*’), it doesn’t matter if we apply ad hoc formatting to the paragraphs in question, since the wildcards will match the rest of the style name.
Another way to exclude content from your book depending on configuration is to add a style substitution in the Paragraph style substitutions property. If you added ‘Epub Only:Comment’ to this property, paragraphs formatted with ‘Epub Only’ will be omitted from the final ebook, since paragraphs with the ‘Comment’ style are removed.
For more on these and other methods for achieving conditional formatting, please see the chapter Conditional Formatting.
If you wish to have Jutoh insert numbers or text in front of headings, follow these steps.
Use consistent heading styles in your book such as Heading 1, Heading 2 and so on.
Go to the Project Properties dialog, click on Page Layout, and check Enable automatic heading numbering.
Click Edit Document Outline Style and assign number formatting for each level. Make the heading style match the styles you are using. To show an outline number such as 1.2.3, set the number of sublevels to be shown.
Close the Project Properties dialog and use the menu command Book | Update. Check Heading numbering and click Update.
Your headings should now show numbering, which can’t be edited manually.
Whenever you have edited your books such that numbering is out of date, use the Update command. Or, to ensure numbering is always up-to-date when generating a book, by checking Update all headings before compiling in Project Properties/Page Layout.
If you only want automatic heading numbering to appear in OpenDocument (ODT) files, or if you simply want to tell the ODT file where to find chapter headings when you’re using the chapter field in headers and footers, you can clear Enable automatic heading numbering.
You can remove heading numbering by clearing Enable automatic heading numbering and updating the headings again via Book | Update.
By default, the appearance of links in ebooks is determined by the viewer, and is normally blue underlined text. Link styles provide an additional layer of formatting for HTML, Epub and Kindle books. With link styles, you can specify how different categories of hyperlink are presented. Link styles are not part of a style sheet, and cannot currently be changed per-configuration.
Here are some scenarios for different ways to use link styles. In your project, you might have:
A single link style which you apply to the whole book.
A link style for the whole book, plus a link style for the contents page.
Separate link styles for internal links, external links, footnotes, bibliographic references, alphabetical index links.
Separate link styles for individual links (by linking character styles with link styles).
No link styles at all, using the default link styling of the viewer software.
You can also apply link styling without manually defining any link styles! By enabling the configuration option Preserve exact link formatting, Jutoh will dynamically create link styling from the formatting you have applied to your project. This option allows your book to have links that are exactly as you see them in the editor; this may not be appropriate for all books, but it may save time if you have carefully added formatting to individual links.
By the way, if you have had enough of this chapter, go on to the next! Link styles are optional, and you can come back to it if you decide your links should be presented differently. Or in Jutoh, just search for “link styles” for this information.
A link style specifies how a link is formatted in each of the four states that a link can be in: normal, visited, active (the link has been clicked on) and hover (the user’s mouse pointer or finger is hovering over the link).
Link styles are separate from all the other Jutoh styles for a couple of reasons:
They apply only to HTML-based formats, and therefore are not a core part of the formatting and editing system.
Link styles can be specified more flexibly than conventional styles and are not tied to specific spans of text or paragraphs. Specifying them separately from the content gives you more options.
To make the second reason more concrete, you can quickly specify the appearance of links that are formatted with several kinds of character style or within certain paragraphs, without changing any other style definitions. Or you can specify the link style for a single document only; or for the whole project, without changing any paragraph or character styles at all.
The link styles dialog can be accessed from the Project Properties dialog, in the Styles page. Click the Link Styles button. Or, you can go to an individual document’s properties dialog, click on the CSS page, and click Edit Link Styles.
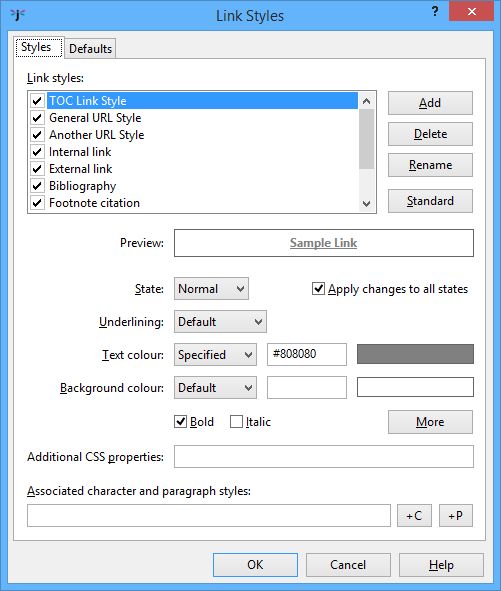
The link style dialog
This dialog has two pages. In Styles, you add, edit and delete link styles. In Defaults, you specify which styles are used for which link categories.
If you click Standard, Jutoh will create a couple of styles for you – for internal and external links – and set the categories in Defaults. You can edit these styles and use them for any other categories you like, such as the whole book or just the currently selected document.
There are check marks against the link styles to let you disable and enable styles in the project. You might want to keep some styles around that you don’t currently use, and styles that are not enabled will not be used by Jutoh.
When you add a new style, or click on an existing one, the underline, colour and other controls relate to the current style – and also the current state selection as described above. The fields in the Styles page are described below.
Underlining: set this to Default to use the default underlining behaviour of the viewer, None to never show underlining, and Underlined to always show underlining.
Text colour: set this to Default to use the default text colour behaviour of the viewer, None to inherit the text colour from the content rather than apply a special link colour, and Specified to show the colour that you can specify in the text field (for example #FF0000 for red or the name “red”) or by clicking the colour swatch next to the text field.
Background colour: set this to Default to use the default background colour behaviour of the viewer, None to inherit the background colour from the content rather than apply a special link colour, and Specified to show the colour that you can specify in the text field as above.
Bold: check to apply bold to this style.
Italic: check to apply italic to this style.
More: click to choose more formatting options, such as small caps or face name.
Additional CSS properties: Enter any further CSS properties that are not available in the settings above.
Associated character and paragraph styles: enter comma-separated character and paragraph styles that this link style should apply to. Click +C to add a character style, and +P to add a paragraph style, or you can type the style names.
To assign link styles to categories such as the whole project, a particular document, or footnote links, go to the Defaults page of the link styles dialog.
General categories can incorporate more specific ones if the specific ones are not used. For example, if you don’t specify link styles for footnotes or alphabetical indexes, but do specify a link style for internal links, then that style will apply to footnotes and alphabetical indexes as well as ordinary links within the book.
See the link styles dialog topic for a list of all the categories.
You can associate character styles and paragraph styles with a link style. Type a comma-separated list in the Associated character and paragraph styles field, or click +C and +P to add character and paragraph styles from a list. You can specify wildcard characters (? for single characters and * for multiple characters) to indicate that several styles should match. These styles will have link formatting generated for them.
You can then apply character styles (such as URL) to links to ‘activate’ the associated link style. Similarly, if you specified paragraph styles, such as “TOC Entry *”, then all links within the TOC Entry paragraph styles will get the appropriate link styling.
If link style categories have been specified, character styles won’t have any effect within that category since specification by link style overrides specification by character style.
Note that when applying a named character style to text that already has formatting, the formatting is combined, creating a new automatic style, and so the original style name may be lost. However, if you specify a style in the URL or page link dialogs when editing with Jutoh 2.58 and above, the named character style is also associated with the underlying link and therefore Jutoh will be able to use that style information when applying a link style even if the character formatting is ambiguous.
If using character and paragraph style associations exclusively, you don’t need to select link styles in the Defaults page. Similarly, if you’re selecting link styles in Defaults, you don’t have to use character or paragraph style associations. Or, you can use a combination.
There are several configuration options that relate to hyperlinks that are worth knowing about.
Preserve exact link formatting, as we have already seen, will dynamically create link styling from the formatting you have applied to your project. This applies to the whole project, and is used as the fallback if no relevant link styles have been found (which is the case if you haven’t added or enabled any). All link states will be formatted the same way, whether normal, visited, hover or active.
Permit links to absent content lets you omit sections from your book without complaints about missing links if the target is not found. For example, this could be useful when making a sample. By enabling this option, you are effectively switching off the warning about the missing link targets, indicating that you know what you are doing!
URL attribute removal style removes the specified formatting from links so they can be formatted by link styles or the default viewer behaviour. Jutoh uses formatting to indicate in the editor that there is a URL, but this may interfere with proper link formatting if retained. By default this is set to “URL” and so removes colour and underlining from links.
In this chapter you have learnt a lot about styles and how to edit and apply them. You also saw how link styles can be used to change the way links are presented instead of using the usual blue/underlined text. Next, we’ll look at Jutoh’s ‘string table’ feature which gives you another way of customising your books.
Contents | Start | End | Previous: Chapter 11: Working With Indexes | Next: Chapter 13: Working With String Tables